


Looking to understand and setup rate limiting / throttling on yourAWS API Gateway REST/HTTP/Websocket API? This is the article for you.
Throttling is an important practice to protect APIs from being overwhelmed with requests. There are many benefits of implementing throttling when working with API Gateway. This can include things like:
- Cost Savings
- Client Level Traffic Shaping
- Downstream service protection
There’s many more, and you may a use case totally different. But the basic idea is what we want to control the rate in which clients can make requests to our API.
In this post, I’m going to show you how to setup throttling on your API Gateway API.
So let’s get started…
Prefer a video format? Check out link below for my YouTube video on API Gateway Throttling.
Pre-requisites
- An HTTP or REST API in API Gateway. If you don’t know how to set one of these up, check out my walkthrough video here for REST and here for HTTP.
- The AWS CLI configured with an IAM user with API Gateway permissions
Starting State
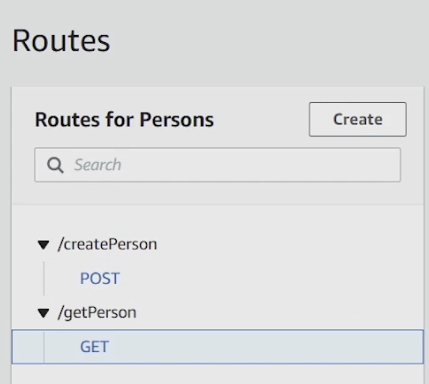
To start, we have two APIs created: /createPerson which is a POST, and /getPerson which is a GET. You don’t necessarily need two different APIs fort his demonstration, but this is helpful to follow along.
Step 1 – Initial Configuration
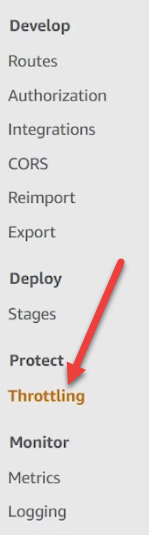
Head over to the Throttling section of the API Gateway console as referenced in the image below:
You’ll be asked to select a stage. This typically refers to different development environments, test/beta or production for example. Select whichever stage you’d like to apply the throttling rules to.
From here, we’re shown the default throttling screen as seen below. This is where you’re going to be managing your throttling rules for your APIs.
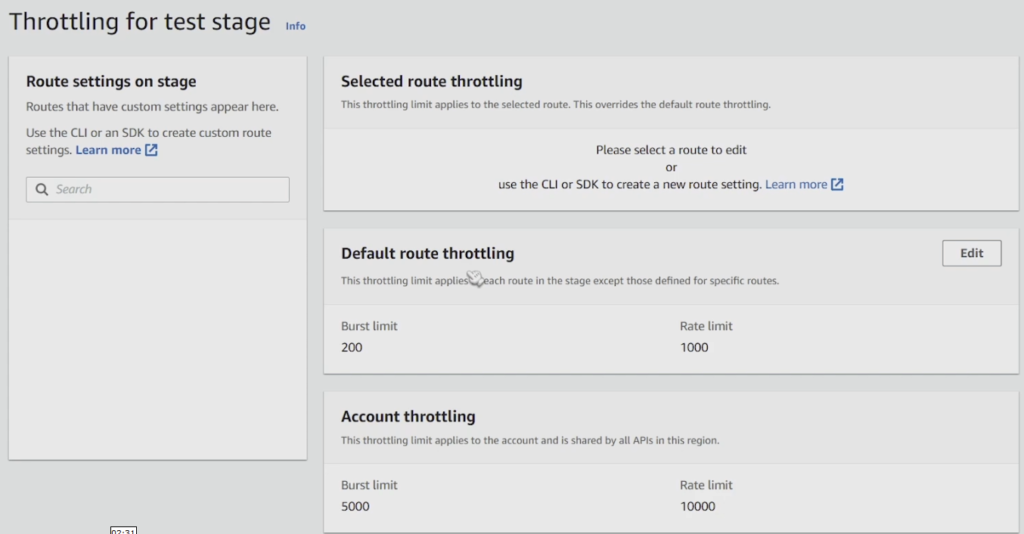
You’ll notice that the left section below the search box is blank. This is because we haven’t yet created any throttling rules. Once we do, we’ll be able to refer back to them in this section.
Also note the Default Route Throttling section in the middle of the image. You can set up your APIs such that if you don’t specify a throttling limit for it, it will automatically inherit the settings you’ve specified here.
At the bottom section, you’ll notice Account Throttling. This is a quick way to limit the amount of requests across an entire region in an account. This is great as a fail safe to protect your application from getting spammed and racking up bills as your APIs get invoked.
You can modify your Default Route throttling and take your API for a spin. Setting the burst and rate to 1,1 respectively will allow you to see throttling in action. Go ahead and change the settings by clicking on Edit and putting in 1,1 respectively. Now go try and hit your API endpoint a few times, you should see a message like this:

Side topic – Burst and Rate
You’ll notice two of the configuration settings available to us is Burst and Rate (rate is sometimes also called sustain). These two terms are defined in the context of the token bucket algorithm which I have a whole article about here.
In order to understand these concepts, lets visualize a bucket filled with water. The Burst refers to the size of the bucket. The larger the bucket, the more water you can hold at once.
The Rate or Sustain refers to the amount of water being refilled per moment time – basically, the thickness and velocity of the incoming water stream. If you have a thick hose, something akin to a firefighter hose, you can refill your bucket basically instantly. With a garden hose, not so fast.
Lets apply this example to API throttling – Burst is the amount of requests our API can absorb at a single moment in time. This is measured in transactions per second or TPS. The higher the number you set your Burst limit as, the more requests your can serve concurrently.

This doesn’t mean your API will necessarily be able to serve traffic at this rate indefinitely. This is where Rate comes in. Our rate setting specifies how fast the bucket is refilled with ‘units’ of TPS. The higher the number, the faster it will be refilled.
We can combine these values in interesting ways to get some interesting behaviour.
For example, if our Burst and Sustain are equivalent, it means that we can hold steady state traffic at that rate, 100 TPS for example, indefinitely.
If our Burst is 500 and rate is 100, it means at a moment time, we can handle 500 TPS. However, in the next moment time, we can handle 100, and the next 100, and so on. If we have a period of 5 second 0 traffic intervals, our bucket will be ‘refilled’ again and back at maximum capacity, 500 units in this case.
You can massage these values to manipulate traffic in many ways
Sorry for the derailment here, its just that Burst and Sustain are pretty important concepts you need to know about when it comes to rate limiting / throttling.
Step 2 – Speicfy API Level Rate Limits
To specify API levle rate limits, we must use the AWS CLI. For whatever reason, atleast at the time of writing, this is not possible to do through the UI itself. However, after running the CLI command, we’ll be able to see our API level configurations in the left hand side of the Throttling page.
To update my /getPerson api with a 5, 5 setting (this is an absurd configuration btw), you run the command below.
aws apigatewayv2 update-stage --api-id <YOUR API ID> --stage-name <YOUR STAGE> --route-settings '{"GET /getPerson": {"ThrottlingBurstLimit":5,"ThrottlingRateLimit":5}}'
Make sure you swap out your API Id (retrievable via the console), your stage (in my case test), and your correspond API name and method.
After running this command and refreshing the throttling section, you should see something like the image below.
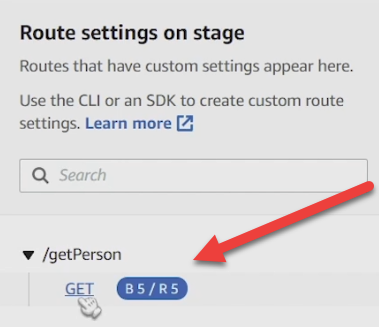
And thats it! Your API is now rate limited.
One thing to note is that you can always do this using CDK or CloudFormation via SAM. I have some great youtube videos on these topics that can get you started on your Infrastructure as Code journey. Check them out below. There’s also a great article by AWS on this topic here that you can use as a resource.


