


Trying to figure out how to safely and securely connect to your RDS or Aurora database that’s in a private subnet? This is the article for you.
Many getting started tutorials that use Amazon RDS or Aurora create a public IP address as part of setup. This makes it easy for developers to gain access to their database during development, but is a huge security vulnerability that can compromise sensitive data.
The recommended approach by AWS is to place private resources (such as a database) in a private subnet. A private subnet has no ability to communicate with the public internet directly. This allows us to isolate our data from the outside world while still making it accessible to our back end applications.
But now, by following security best practices, we’ve made it hard for ourselves to access our own database during development – say, for instance, from our home or work machine. This creates a dilemma for developers – we want to lock down our database for security, but need access to it for administrative/development purposes.
This article is going to show you how to use a ec2 bastion host (sometimes also called a jump box) that will allow you to connect remotely to your RDS/Aurora instance via SSH tunnelling. I’m going to walk you through all the network setup that you’ll need to run through including setting up private subnets, security groups, your bastion host, and your RDS instance. We’ll be using the Default VPC (Virtual Private Cloud) that comes with every AWS account.
By the end of this article, you’ll have an RDS/Aurora instance in a private subnet that is safely protected from the outside internet. You’ll be able to use tools like pgAdmin, DataGrip, or other RDBMS IDEs to access your database. This will be a step by step tutorial that walks you through every single step.
So let’s get started.
Note: this tutorial will work for all types of databases including on RDS (MySQL, Postgres, Oracle, MSSQL, etc) and Aurora (Postgres or MySQL). The endpoint you connect to in the final step may be slightly different, but the process to establish VPC connectivity is the same.
Solution Overview
In recent years, AWS has added tools in the RDS console to set up your database with connectivity to your EC2 instance. This certainly has helped people unblock themselves quickly, but my problem with this approach is that you don’t actually learn the concepts that you need to learn to understand what’s going on behind the scenes. My intention in this tutorial is for you to both understand how to set up connectivity, and show you how to do it properly.
Below is what our final end state will look like (or atleast very close to it).

Our solution will consist of a EC2 t2.micro instance placed in a public subnet. It will have a security group associated with it that allows SSH connection requests initiated from the outside internet (e.g. your home/office). You could also make this more restrictive to only allow connections from your home IP address.
We will also have a private subnet (two actually, for reasons we’ll get into later) that has our Aurora cluster placed inside it. The instances in this cluster will have a different security group that allows Postgres connections from the bastion host’s security group. This will allow your Aurora instance to be able to be connected to from your bastion / EC2 host.
Finally, we’ll use initiate a SSH tunnel from our home machine using our EC2 machine as the entrypoint to the VPC. The SSH tunnel will forward requests to our Aurora instance so that we can access it.
This is our end state. If it’s not immediately clear what’s going on, don’t worry – we’re going to walk through every step.
Starting State – Default VPC Public Subnets
When you create an AWS account, AWS automatically creates a default VPC for you. A VPC (or Virtual Private Cloud) is an isolated network space in the AWS cloud. VPCs allow you to control network connectivity of the infrastructure that you deploy in your account. For example, you have the ability to create infrastructure in certain network spaces of your VPC that are visible to the outside world. This typically includes public facing resources like web application endpoints. On the contrary though, you definitely do not want to put things like databases in a public facing network space. This creates a very real vulnerability that attackers can easily exploit.
One of the building blocks of a VPC is a subnet. A subnet is quite simply a range of IP addresses that exist within your VPC. We use them to logically isolate groups of resources from one another. For example, for resources such as a web app that require incoming requests from the internet, we’ll place them in a public subnet so that they can be called from the internet. For resources such as an RDS database that we want to hide from the public internet, but that can remain callable from our web application, we place it in a private subnet.
Your default VPC already comes with subnets across each availability zone in every region. So for example, in us-east-1, my account has six public subnets across us-east-1a, 1b, 1c, 1d, 1e, and 1f. You can see this in the image below under the subnets section in the VPC section of the AWS console.
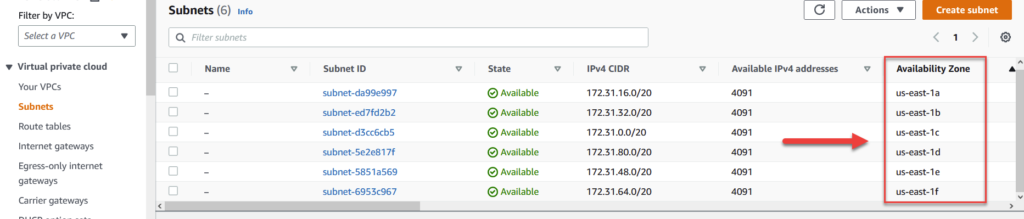
By default, when you launch an EC2 instance into any one of these subnets, they will be assigned a public ip address that you can use to connect to it. The public subnet us-east-1a is one that we’ll be using later in the tutorial section of this article.
Our starting state (just using one subnet for simplicity) looks like the following:
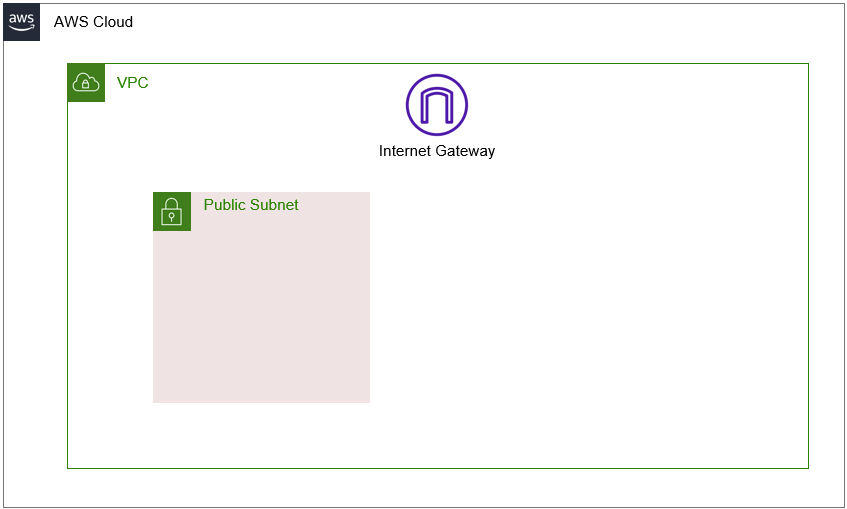
As you can see in the image, all we need is a single public subnet to get this setup working. From here, we need to add private subnets that we will later use to host our Aurora database in.
Adding Private Subnets
Our next step will look like the image below. We’ll be creating a private subnet that has no connectivity from the outside world. Note that in order for this subnet to be truly private, we’ll need to create a custom route table that has no access to the public internet. By default, your subnets will inherit the route table from your main VPC which does have internet access enabled. I’ll show you how to do this in the walkthrough section of this tutorial.

One thing I wanted to point out that isn’t reflected in the picture above is that we’ll need to create two private subnets, not just one. The reason is because when launching an RDS/Aurora instance, you need to create something called a Subnet Group.
Subnet groups are collections of subnets that need to cover atleast two availability zones. Since a subnet (public OR private) can only exist in a single availability zone, we’ll need to create two in order to successfully launch our instance. Below is the error you will get if you try to create a subnet group with subnets that belong to only 1 AZ.

Despite the fact that we’re creating two private subnets, in reality we’ll only be deploying our database instance into one of them. I suspect the reason this is enforced is because there is a feature called multi-az deployments that allow you to place a standby instance in a second AZ. If you don’t have atleast two AZs in your subnet group, you wouldn’t be able to use this feature. Learn more about the feature here.
After we create our basic network topology, we’ll be ready to create our Bastion Host / Jump Box.
Create and Configure Our Bastion Host / Jump Box
In this step, we will be launching a t3.micro instance (free-tier eligible) into our public subnet. Our public subnet will be capable of receiving connection requests from the public internet, however by default our EC2 instance will refuse these requests. This is because we need to modify our EC2 instances security group.
Security Groups are entities that get attached to your AWS instances (both EC2 and RDS in this case). For our EC2 instance, in order to truly open it up to the public internet, we will need to modify the associated security group to allow inbound connections from the public internet. This is a quick configuration that I’ll show you how to do later in the console.
Note that as an alternative to opening up your EC2 instance to be accessible from anyone on the public internet, you can configure it to only be accessible from certain IP addresses (i.e. your home network). This allows you to reduce the risk of exposing this instance to unintended outside audiences. You have to be careful with this approach though since home ISPs can regularly assign you a new IP address and cause you to lose the ability to connect.
The image below shows our setup after this step.
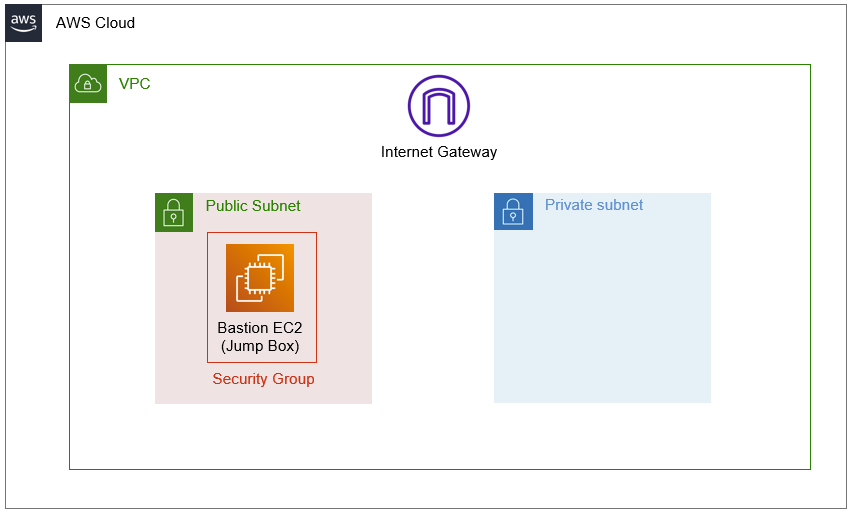
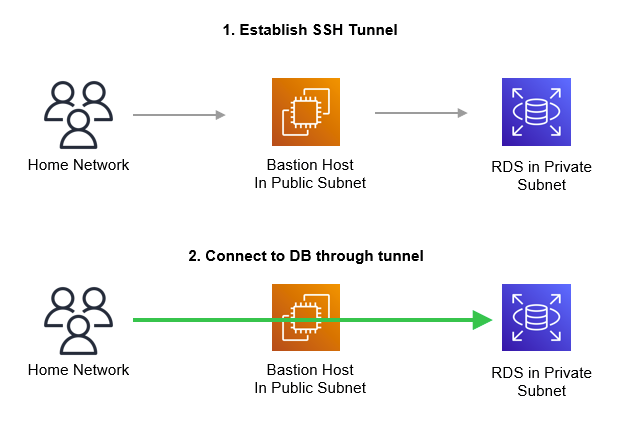
A quick side bar, the name bastion host or jump box are terms that denote how we are using this instance. This instance serves no purpose other than to allow us an entry point into our AWS VPC. By placing it in a public subnet and configuring it with access from the internet, we are creating a “path” for us to connect to it from our home machines. Once we are SSH’d into this machine, we can access all instances in our VPC (provided our route table allows it, which by default it does). Later, we will use this host to facilitate our connection to our RDS instance by using SSH tunnelling. The image below attempts to illustrate this concept.
Create and Configure Our RDS Subnet Group and Instance
As we discussed earlier in the subnet creation step, we will need to create a subnet group that spans our two private subnets. This is a pre-requisite step that we must do before we create our database instance. The image below only shows one for simplicity sake.
Afterwards, we will launch create our database instance and launch it into our VPC and it’s first private subnet. During the creation phase, we will also need to specify the subnet group that we created earlier. After this step, our setup will look like the following:

After you launch your database instance, you may think you’re done and ready to connect to it. However, this is wrong and often where most people start getting frustrated.
Notice that our database instance also has a security group. This is by design as each piece of provisioned infrastructure you create on AWS always has a security group.
By default, your database’s security group will block all connection requests from instances that it does not recognize – this includes your EC2 instance that you just created in the public subnet. What we need to do to correct this is to modify our database’s security group to allow connection requests from our EC2 instance’s security group. This will allow our EC2 instance to communicate with our database instance, and later, allow US on our home network to communicate it with it as well.
Create and Configure Our RDS Subnet Group and Instance
At this point, we’re established everything we need to facilitate network connectivity. All we need to do is use a powershell / terminal command that will form a SSH tunnel from our home machine to our database instance.
Afterwards, we can connect to our database using tools like pgAdmin as if the database was on our local network!
So enough of the theory / explanation, now let’s jump in to the AWS console and actually set this thing up.
Tutorial
Step 1 – Create our Private Subnets
Since we’re using our default VPC, we don’t need to create public subnets since they are already available for us. What we do need to do is to create our two private subnets that we’ll be using in our later steps.
To do this, head over into the VPC section of the AWS console and click on Subnets on the left hand navigation bar (see 1 below).
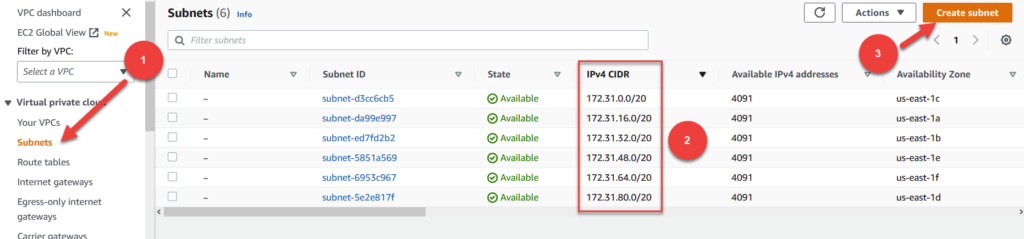
One thing that you need to understand about VPCs (and networking in general) is a concept called CIDR block notation. CIDR stands for classless inter-domain routing. It is a method for allocating certain chunks of IP addresses for the purpose of networking.
Every default vpc starts with 172.31 and has /16 at the end. This tutorial isn’t a lesson on CIDR subnetting, but all you really need to know is that this notation helps us define ranges of IP addresses for each subnet we create. If you take a look at (2), you can see that each subnet within our VPC has similar, but slightly different numbers.
If we look at row 1 (subnet 1) in the table (2), it has a CIDR block of 172.31.0.0/20. This means that any piece of infrastructure deployed in this subnet can have an IP address that ranges from 172.31.0.0 to 172.31.15.255. Note that 255 is the maximum range a section of the block can go up to. This pattern continues for our second subnet with a CIDR block of 172.31.16.0/20. It has a range of 172.31.16.0 to 172.31.31.255.
For our two private subnets, we need to carve out a section of our VPC’s network space. We can do this by following the existing pattern of our default VPC’s CIDR. So for example, if you look at the pattern of our subnets from the image above, you can see that each subsequent row has 16 added to it in the 3rd position. The highest CIDR block in the network so far is 172.31.80.0/20. We are going to follow this pattern and add two private subnets separated by 16 digits each. So the subnets we will create will be 172.31.96.0/20 and 172.31.112.0/20
You can play around with different CIDR blocks to find the minimum and maximum values within each using this neat tool.
To proceed, click on Create Subnet as seen in (3).
First, select the VPC ID that you would like to create the subnet for. Most accounts only have one VPC (the default one) – we’ll be using that. Note that the id of your VPC and subnets may be different than mine.
Second, give your subnet a name that is indicative of it’s function. It can get really confusing working with subnets if you don’t name them correctly. In this case, since this will be a private subnet that we place in availability zone (AZ) 1a, we’ll name it private-subnet-1a.
Third, select the availability zone to place this subnet in. I’m going to place ours in 1a which is the same subnet I’ll be placing our database into later.
Fourth, input the IPv4 CIDR block that we determined earlier. In our case, it is 172.31.96.0/20.
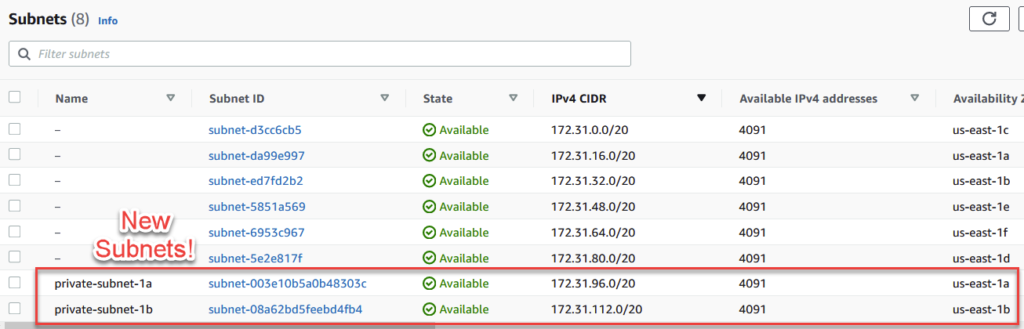
Fifth, repeat this process for your second subnet, but this time naming it private-subnet-1b, placing it in AZ 1b, and giving it the CIDR block of 172.31.112.0/20.
After you’re done, you should see an image like below under the subnets section. Tip: remember to click ‘Clear Filters’ to remove subnet specific filters from your view.
Before we can move on from the land of networking, we need to actually make our subnets private.
Step 2 – Make Our Subnets Private
When creating our subnets via the wizard, our subnets automatically are set to not assign a public ip address when an infrastructure components is created within the subnet. You can see this in the large image below highlighted in yellow.

This is a good first step, but in order for us to make these two subnets truly private, we need to modify the route table they are associated with to dis-allow internet access. As a quick summary, a route table defines the networking rules of which direct how network traffic travels within your VPC. You can learn more about them here.
By default, when you create a new subnet, it uses the route table that is assigned to the VPC. In our case, that is rtb-632e551d. If we click on it, and go to Routes, we can the rules of this route table as seen below.
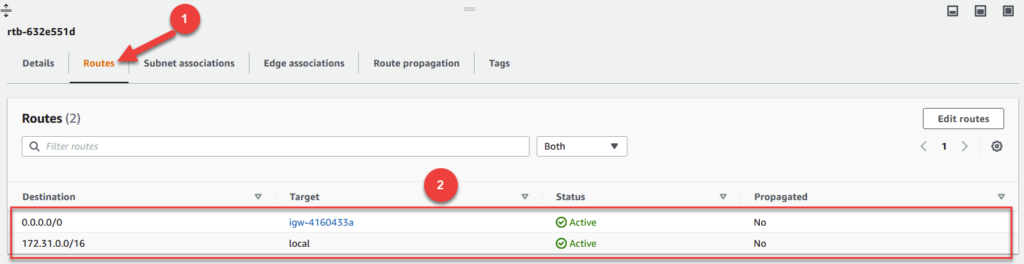
To access your route table, click on Routes as seen in (1). From there, we are shown a list of routes (2) in a table. The first row with a destination of 0.0.0.0/0 means that all traffic that is trying to access the public internet needs to flow through the target. In this case, the target is our internet gateway that comes with our account by default.
Our second row has a destination of 172.31.0.0/16 and a target of local. This route allows instances in the VPC to talk to others that are also in the same VPC. Without this record, instances in our subnet would be isolated not able to talk to any other machine.
We don’t have a problem with the second entry since it just enables communication within the network. However, we do have a problem with the second entry since it allows infrastructure that is associated with this route table to talk to the private internet. This is a big no-no for a private subnet and something we need to address by different route table.
Step 3 – Create a Route Table For Private Subnets
In this step, we first need to create a new route table that only has intra network access. Afterwards, we will associate our newly created route table with our two private subnets, private-subnet-1a and private-subnet-1b.
To do so, click on Route tables as seen in (1) below. Notice on the next page, we only have one route table – the one that is currently assigned to our main VPC. Create route table in the top right as seen in (2).

In the wizard, fill out the settings as follows:
First, name your route table private-subnets-rt.
Second, select your VPC.
To proceed, click on Create Route table in the bottom right.
In the subsequent screen, take a look at your Routes in the table at the bottom of your screen. You can see there is only one rule which allows local network connectivity. Great!
Step 4 – Associate New Route Table with Private Subnets
To associate our newly created route table with our private subnets, click on the check box beside your route table (1) and observe the pop up menu at the bottom of your screen.
Click on Subnet associations in this menu area (2) and scroll down to where it says Subnets without explicit associations. Click on Edit subnet associations (3).
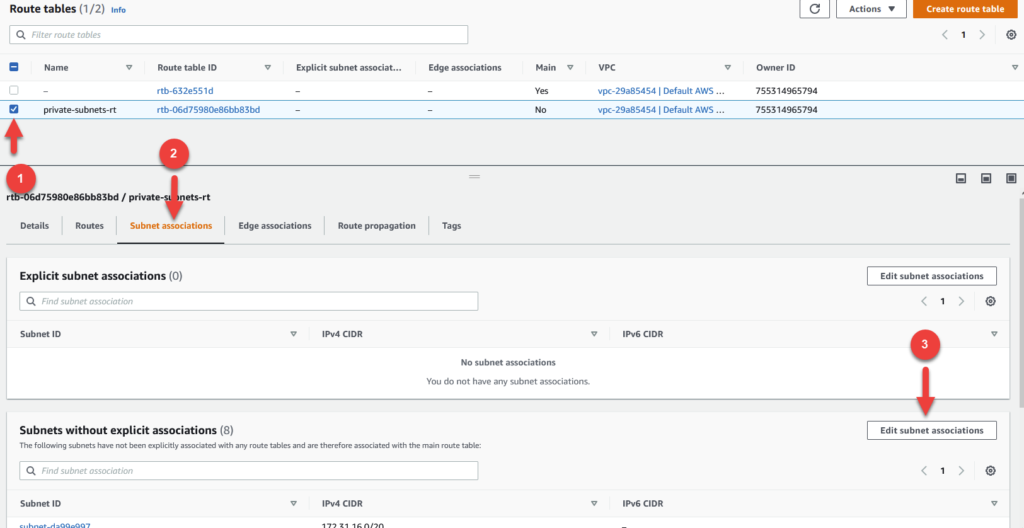
In the next screen, click on the checkboxes beside private-subnet-1a and private-subnet-1b and click Save associations in the bottom right. This will complete the process of assign your new route table to your private subnets.
At this point, we’re done with subnets and we can move on to launching our EC2 instance.
Step 5 – Launching EC2 Instance Into Your Public Subnet
Head over to the EC2 section of the AWS console and click on Instances in the left hand navigation bar. Click on Launch Instances in the top right.
In the EC2 creation wizard, fill out your settings as follows:
Name can be set to jump-box.
Use the default Amazon Linux 2 AMI.
For Instance Type, select t2.micro which is free-tier eligible.
For Key pair (login), click on Create new key pair and download this keypair to your local drive. Keep this .pem file handy as you will be using it from this point forward when trying to connect to your instance. I’m going to name mine rds-test.pem .
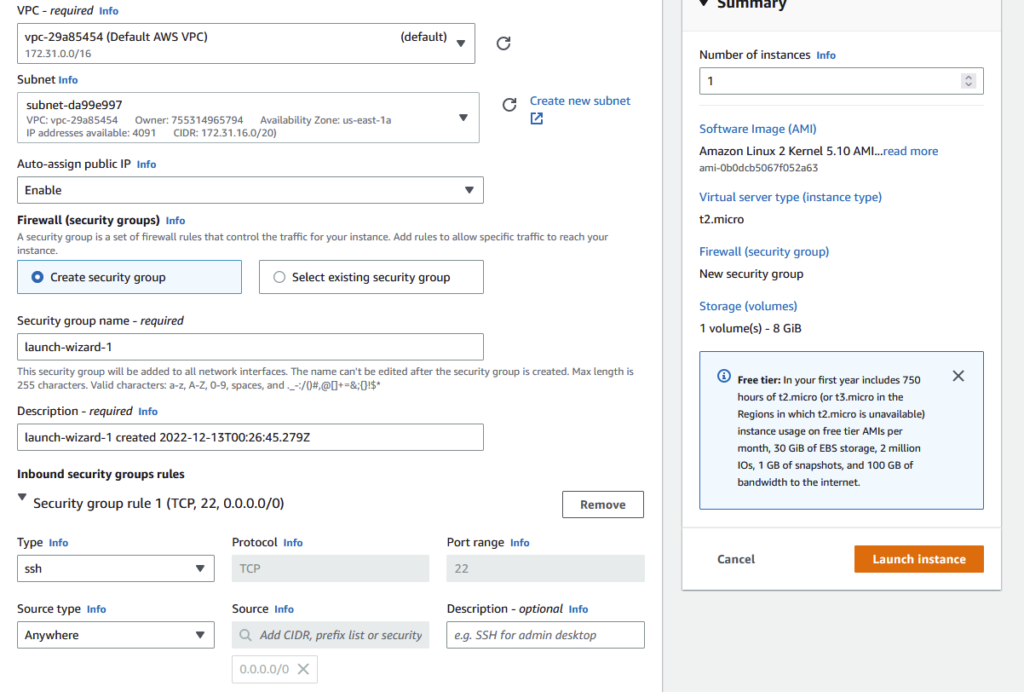
Under Network Settings, click on the Edit button.
Make sure your VPC is selected.
For Subnet, select your public subnet located in AZ us-east-1a.
For Auto-assign public ip, set to enable.
Select Create security group and give it a name. In my case its launch-wizard-1 (not very informative, I know).
Notice under inbound security group rules the rules that the wizard is proposing. This rule is of Type SSH, uses the TCP protocol, and has source type as anywhere. This will allow you to connect to this instance from any machine on the internet. If you would like to restrict this to only your IP address, click on the Source type dropdown, and select My IP.
Here’s a screen grab of my network settings for this machine.
Step 6 – Test Connectivity to EC2 Instance
In the subsequent screen. Notice the Public Ipv4 Address in the table. In my case, its 52.73.179.180 . Copy this value to your clipboard.
Launch up terminal (on mac/linux) or powershell (on windows) and navigate to the folder where you downloaded your .pem file from the previous step. Run the following command:
>>> ssh -i your-pem-file-name-here.pem -l ec2-user your-ip-address-hereUsing my values, that translates to:
>>> ssh -i rds-test.pem -l ec2-user 52.73.179.180After typing yes to the SSH prompt, you should now be successfully SSH’d into the jump box as seen below.
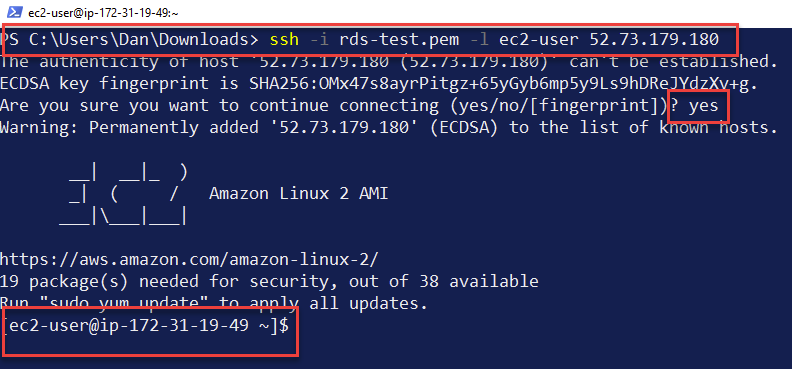
Note that if you are on a mac and you ran into an error along the lines of “permissions not required” or something alike, type the following in your terminal: chmod 400 your-pem-file-name.pem and try SSHing again.
You can now type exit to get out of the jump box and move on to our next step.
Step 7 – Create RDS Subnet Group
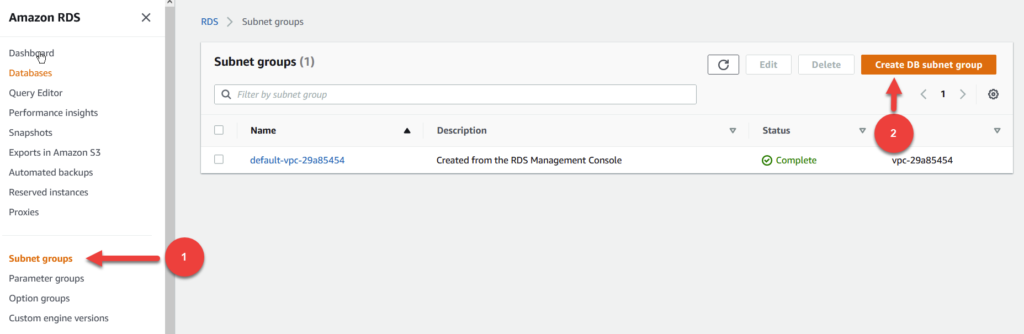
Head over to the RDS section of the AWS console and click on Subnet Groups (1) in the left hand navigation pane. Go ahead and click on Create DB subnet group to launch the creation wizard.
For name and description, input private-subnet-group .
Select your VPC.
Under Availability Zones select the checkboxes for us-east-1a and us-east-1b (or whichever two regions you are using for your private subnets).
Next, select the two private subnets from the two availability zones. My filled out settings look like the following:
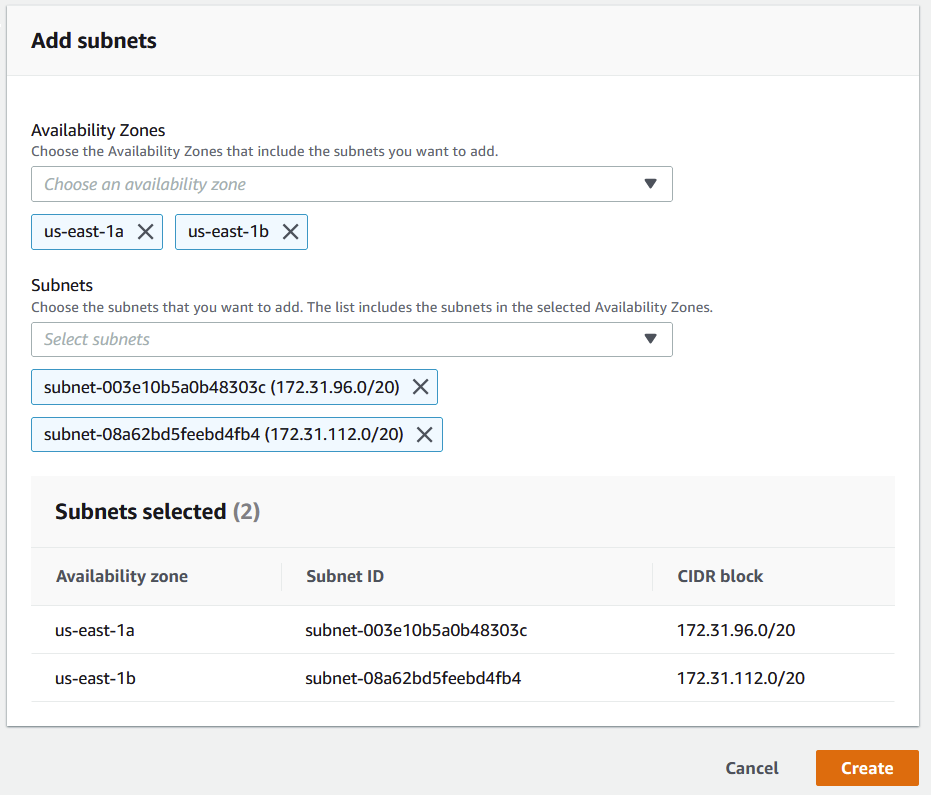
Go ahead and click on Create.
At this point, we’re finally ready to create our Aurora instance. Do keep in mind though these next steps will work the same regardless of if you are using Aurora or RDS.
Step 8 – Create your Aurora or RDS
To create your database, click on Databases on the left hand navigation bar and click the Create Database button.
We’re going to use Standard Create.
For Engine Type, select Amazon Aurora and tick the radio box that says Amazon Aurora PostgreSQL-Compatible Edition. Note that you can use another database type here if you’d like, or even the Serverless variation of Aurora as well – all will work.
For templates, select Dev/Test.
For Master Password, input a secure password.
Change your Instance Type to something small like a db.t3.medium or better yet, use serverless.
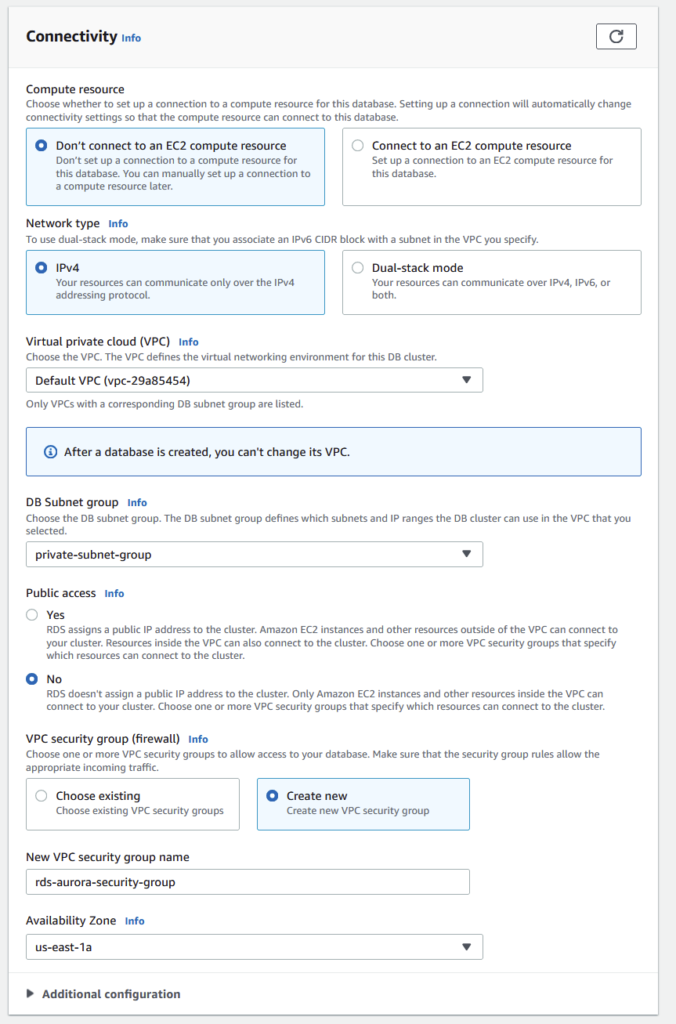
Under the Connectivity section, make the following changes.
Select your VPC.
Change the DB Subnet Group to be private-subnet-group which is the one we created in the previous step.
For Public Access, click No.
For Security Group, click Create New and name it rds-aurora-security-group. Finally, change the availability zone to 1a (the same AZ as our jump box from earlier steps).
Below is an image of my Connectivity settings.
Go ahead and click on Create Database in the bottom right. You may need to wait a few minutes for your instance to become active. You’ll know its ready when your Instance’s status says Available.
Our final step is to make a small modification to our Aurora instances security group to allow connections from our jump box.
Step 9 – Allow Aurora Security Group Inbound Connections From Jump Box
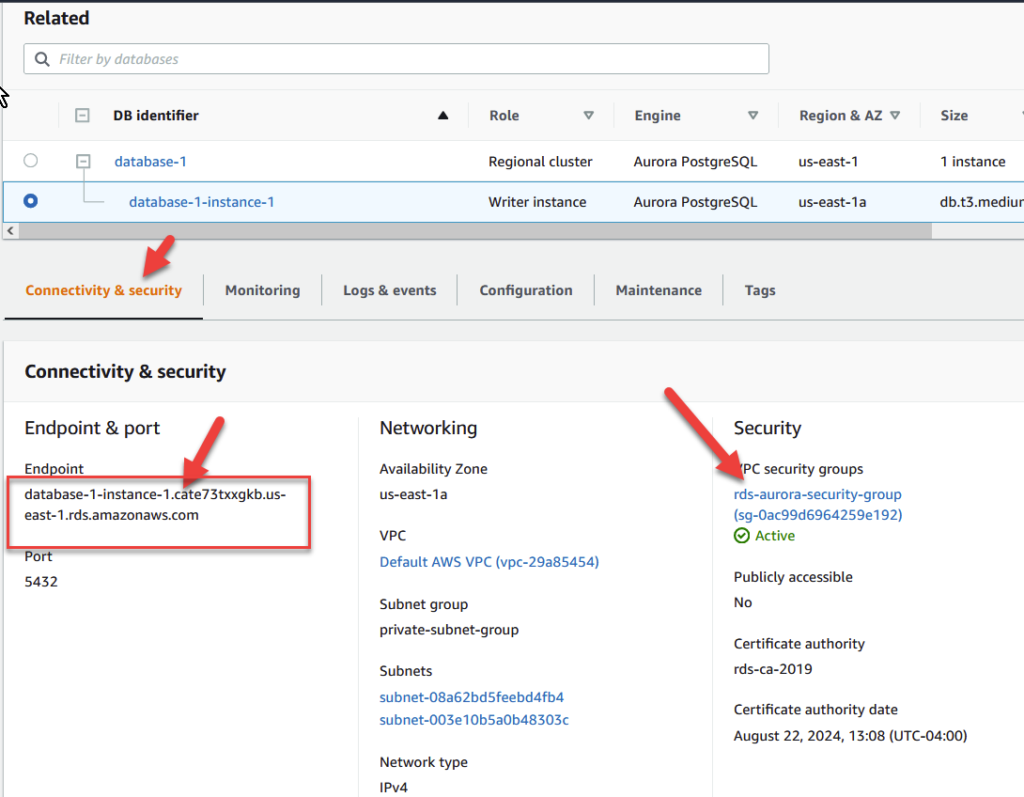
Click on your database instance and navigate to the Connectivity and Security tab and notice the link to our rds-aurora-security-group as seen below. Also notice our Database Endpoint which in my case, is database-1-instance-1.cate73txxgkb.us-east-1.rds.amazonaws.com. Copy this Endpoint to your clipboard as we’ll need it a bit later. For now, click on your security group which in my case is rds-aurora-security-group.
On the following screen, we need to change the inbound security rules by clicking on Edit inbound rules and clicking Add Rule.
Make sure that Type is set to PostgreSQL. Note that if you’re using a different database type like MySQL or Oracle-RDS, change the type.
Notice the port is 5432. This port is Postgres specific (MySQL is usually 3306, Oracle-RDS is usually 1521).
Finally, change the source to be the security group of your jump box. In my case, its name was launch-wizard-1 (see Step 5 for a reference).
Your changes should look like the following:

Click on Save rules to proceed.
At this point, we’re FINALLY ready to try and access our database from pgAdmin. But before that, we need to open up our terminal and form an SSH tunnel between our home/work machine and into our Aurora instance via our bastion host.
Step 10 – Forming an SSH Tunnel
For this step, we’re going to need our Jump Box’s public IP address and the DNS of our Aurora database. Mine are 52.73.179.180 and database-1-instance-1.cate73txxgkb.us-east-1.rds.amazonaws.com respectively.
Open up a terminal and navigate to the location where your pem file is located. We’re going to use the following command:
>>> ssh -i your-pem-file-name.pem -f -N -L 5432:aurora-db-dns:5432 ec2-user@jump-box-public-ip -vReplacing this command with my values, we get:
>>> ssh -i rds-test.pem -f -N -L 5432:database-1-instance-1.cate73txxgkb.us-east-1.rds.amazonaws.com:5432 ec2-user@52.73.179.180 -vThis launches a background job that forms the SSH tunnel. Your command line output should show something like the following:
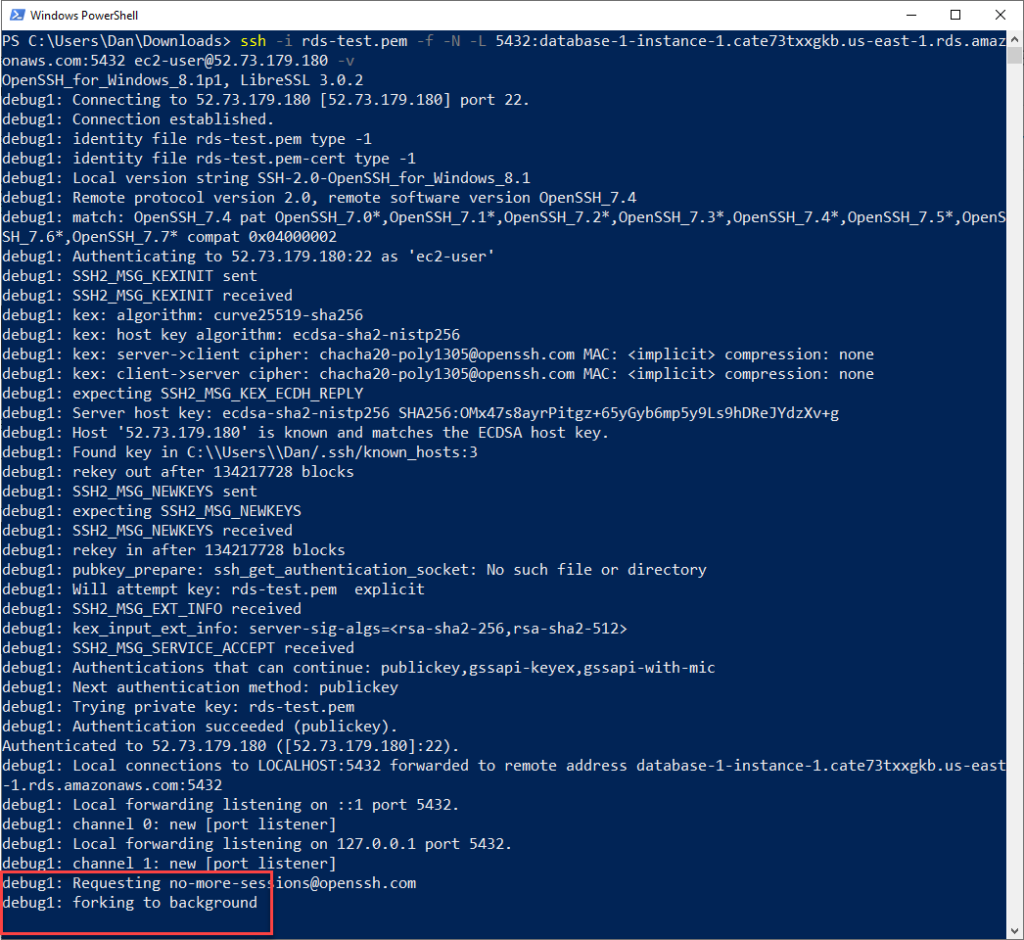
You’re now ready to launch up pgAdmin and test out the connection!
Step 11 – Launch pgAdmin and Connect To Your Database
You’re now ready to connect to your database. Spin up pgAdmin and create a new connection with these settings:
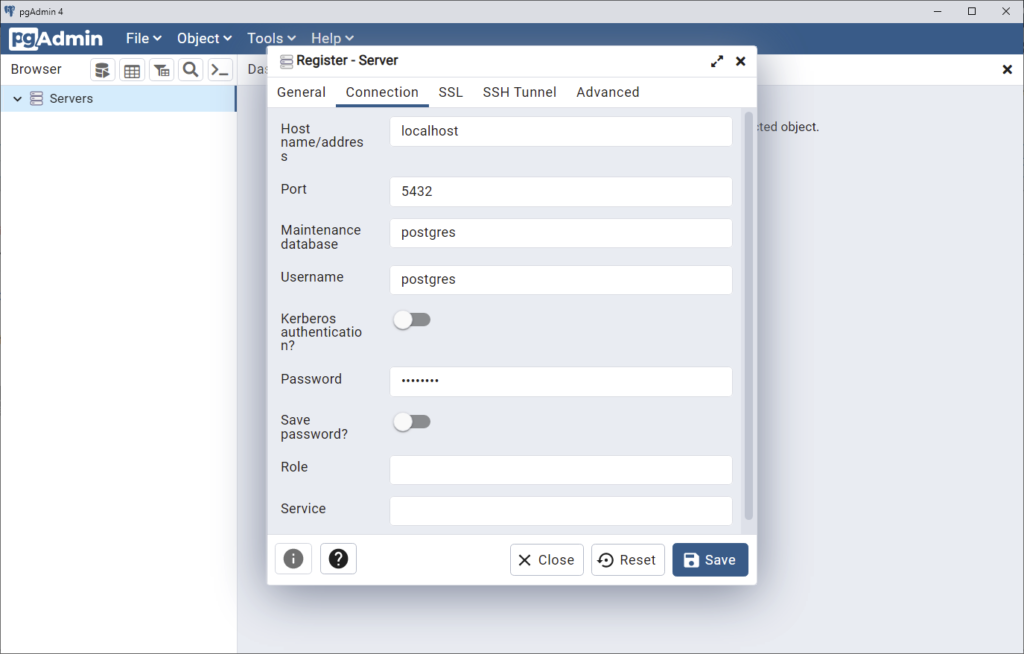
Make sure to set the host name as localhost, port as 5432 and username/password as the values you specified during the aurora creation step.
After clicking Save, you should now see your database listedon the left hand side of pgAdmin like you see below.
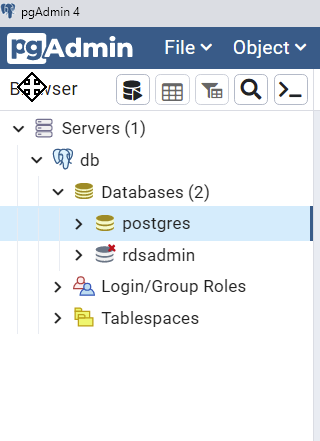
Congrats, you’re done! Don’t forget that any time you need to connect to your database, you need to run your SSH Tunnel command first.
If you enjoyed this article, check out these others:


Hi Daniel. Nice article and easy to follow. I do have a question though. This relates to someone connecting to an RDS database for administration purposes. How would you get an external service, like API Gateway, to talk to a database in a private subnet, for example to query back data to display on a webpage? So the flow I have in mind is a website making calls to API Gateway, and that connects through to either a Lambda or some VPC endpoint to then query a database in a private subnet do perform CRUD operations. Can you please help clarify this 🙂
This article helped me a lot. Thanks Daniel for writing it in such a simple way.
This article is great. I’ve implemented the steps, successfully tunneled with ssh, and now I get authentication errors using the user name and password created for RDS in Secrets Manager. Any suggestions? I copied the values directly from Secrets Manager and have rotated the password 4 times with same outcome.
psql: connection to server at “localhost” (127.0.0.1), port 5432 failed: FATAL: password authentication failed for user “postgres”
Hi, I hope you solved it by now. Just incase, I am dropping it here. I faced the same issue with password authentication. If the password is generated automatically by secrets manager, then simply copying the password will not work. you have to make sure you attach the generated password to your Rds instance or cluster. Using this “Type: AWS::SecretsManager::SecretTargetAttachment” . Thank You
Hey Danial, can’t thank you enough for a detailed step by step tech note.
An awesome article that is way better than any paid training out there.
Keep up the good work and more importantly sharing your knowledge with others.
Thanks