


This is a complete beginner guide to Amazon Cognito. you’ll learn about User Pools, Identity Pools/Federated Identities, and how to tie them together.
Amazon Cognito is a huge service that offers many authentication and authorization features. Folks tend to get intimidated by the service because not only do you need to learn about Amazon Cognito itself, but also key Authentication and Authorization concepts.
The purpose of this article is to explain the core concepts of Cognito from a beginner perspective. I’ll also give you the TLDR of Authentication and Authorization concepts to round out your understanding.
By the end of this article, you’ll have a solid understanding of what Cognito has to offer and how it can be used to provide user login and access control to AWS services. This article requires zero understanding of how authentiction/authorization concepts work. We’ll start from essentially zero knowledge.
But before we get started with the features, lets quickly overview some important definitions you’ll want to understand. I’ve attempted to classify the definitions into categories that are specific to Cognito, and others that are more generally related to authentication/authorization. Don’t get intimidated if you don’t understand the specifics of these definitions right now – they’ll become more clear throughout the article. Feel free to scroll back to the following section if you need a reminder.
Definitions
General Definitions
- Authentication – Sometimes called authN, Authentication refers to identifying who a user is. This is commonly accomplished with a login form and a username/password. However, a user can be authenticated using other means such as biometrics (such as using your face id when opening your iPhone).
- Authorization – Sometimes called authZ, Authorization refers to what a user has access to.
- Authorization Server – Despite having the name Authorization in it, an Authorization Server is also responsible for Authenticating the user. The Authorization Server generates tokens that are used to identify a user and guard access to backend resources. Authorization servers are also responsible for communicate with other Identity Providers such as Social Sign On providers (Google, Facebook, etc) to authenticate the user.
- OAuth 2.0 – The internet standard protocol for authorizing users to an application. Is a delegated authorization framework that allows users to obtain access to applications.
- OpenID Connect – An extension of OAuth 2.0 that offers authentication (login) features.
- Identity Token – An encoded string, that once decoded contains information about the user (name, email, etc).
- Access Token – An encoded string that is used to validate a user’s access to a resource server.
- Authorization Code – A temporary code (string) that is exchanged for an Access Token. Is used in the Authorization Code flow described below.
- Implicit Grant Flow – An OAuth 2.0 flow used to grant access tokens to users. This flow has security loopholes and should be avoided.
- Authorization Code Flow – An OAuth 2.0 flow used to grant authorization codes to users, which are then exchanged for access tokens. This is an improvement upon the Implicit Grant flow that has a better security profile and fewer loopholes.
- Scopes – Scope is a mechanism in OAuth 2.0 to limit an application’s access to a user’s account.
- Claims – Keys/Values about the user encoded in the Access/ID token.
- Identity Provider – Sometimes called IDP, is a system that provides authentication services to client applications. Cognito is an Identity Provider, as is Google and Facebook when leveraging social sign on.
- Social Sign On – A method to use a third party Identity Provider to access your Cognito User Pool.
Cognito Specific Definitions
- User Pools – A directory of users that sign up either directly through Amazon Cognito or via a Social Sign On Identity Provider (Google, Facebook, etc.).
- Federated Identities / Identity Pools – A method to grant Cognito users temporary access to AWS services.
- Hosted UI – A Cognito provided URL / Website that allows users to sign in to your userpool. Post successful authentication, the user is re-directed back to your website (sometimes called callback URL) with either an Access Token (in the case of Implicit Grant flow) or Authorization Code (in the case of Authorization Grant flow).
- Groups – Users in your Cognito User pool can be tagged as a member of a group that you define (i.e. student, instructor) to grant different levels of access.
- Triggers – Snippets of code that can be run at different stages during the login process (i.e. pre-signup, post-signup, post-login). Triggers can be used to add different functionality such as tagging a user as part of a group after they initially register.
Great – now we have an understanding of some common authentication/authorization and Cognito specific terms. Lets jump into discussing the two key categories of Cognito: User Pools and Federated Identities.
User Pools and Federated Identities (previously known as Identity Pools)
The first thing to understand about Amazon Cognito is that it is broadly separated into two distinct categories – User Pools and Federated Identities (up until recently, referred to as Identity Pools). Lets briefly overview what these two are before diving into the details for both.
User Pools at a High Level
To put it simply, a User Pool is a user directory within Amazon Cognito. It contains records of users that either sign up directly in Amazon Cognito, by Social Identity Providers (Google, Facebook, LWA, etc) or by using legacy SAML Identity Providers. Essentially, think of a user pool as a table of user records. User Pools abstract away the complexity of you as a developer having to store and manage usernames, passwords, logins, sign ups, lost passwords, so on and so forth.
As an administrator of Cognito and owner of a User Pool, you set the rules in terms of which Identity Providers an individual can use to register for your application. Some prefer to only allow users to sign up directly within Cognito. Others prefer to offer social sign on which allows you to delegate authentication to the other service like Google, Facebook, and others. Authentication is achieved through a well known OAuth 2.0 extension called Open ID Connect (OIDC). All well known Social Sign On providers like Google and Facebook support this well known protocol. You can learn more about OIDC here.
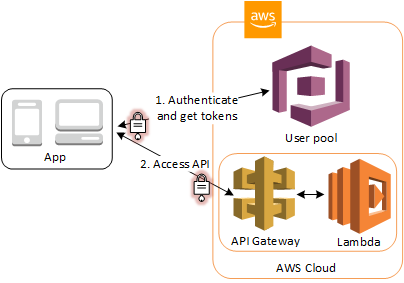
Here’s a brief image outlining the role of User Pools in the ecosystem of Amazon Cognito:

The key thing to remember is that User Pools are all about user directories and user management.
Now we have a high level understanding of what User Pools are. Lets briefly cover the other half of Cognito – Federated Identities.
Federated Identities at a High Level
Federated Identities (formerly Identity Pools) are a way for you to uniquely identify users and assign temporary access to AWS resources. With an Identity pool you link your User Pool or other Social Identity providers such as Google/Facebook. Afterwards, you can set up IAM Roles that users will inherit. You can set up some pretty complicated rule matching to specify which users (based on attribute or other means) will get to use which IAM Role. As a quick reminder, IAM stands for Identity and Access Management and is the primary AWS service used to manage access to AWS resources.
You can also have “Guest Users” that use a default role. This allows you to create applications that provide restricted temporary credentials to users that do not yet register for an account in your application.
The thing to remember about Federated Identities is that they are used to manage what AWS resources a user has access to.
Now that we have a high level understanding of the two big concepts in Cognito, lets dive into each of them more in detail – starting with User Pools.
User Pools in Detail
Part of the reason many folks get confused by User Pools is that there are so many additional features that Cognito offers. But don’t fret – we’re going to tackle these one at a time. So let’s go.
Creating a User Pool
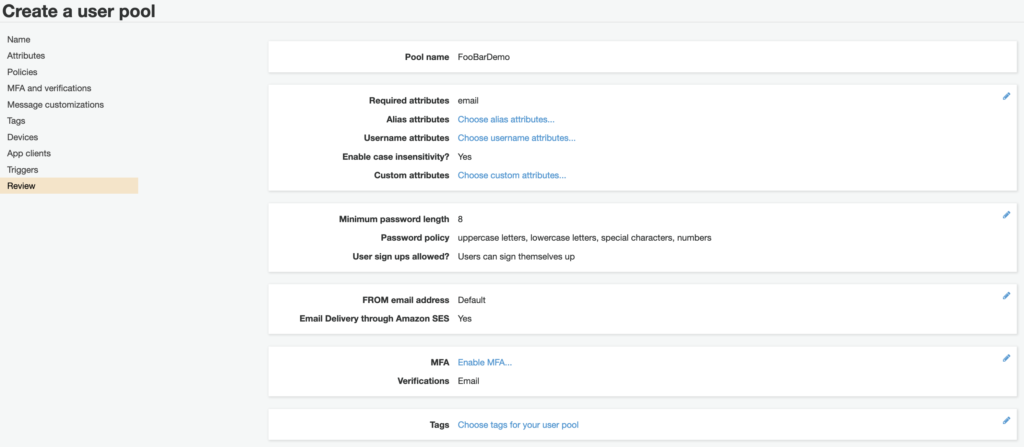
The first step to use User Pools is to create one. When you initially set up a User Pool there are many settings you as an administrator need to specify. This includes things like:
- The name of your user pool.
- Which attributes you will require from the user (phone number, email, address, etc).
- Password policies such as minimum length or combinations of numbers and special characters.
- Requiring Multi Factor Authentication (MFA).
- Post User Signup Email Verification.
- Triggers to run Lambda functions at specific points during the user sign up, login, and many other hooks to provide custom functionality.
You can see the multitude of options available when creating a user pool in the screen shot below. Do note that the Cognito UI is currently undergoing an overhaul and may look slightly different depending on when you access it. The below screenshot is the original or legacy version of the UI.
Remember that user pools are simply a collection of users. But what if we want to leverage this pool of users for a multitude of different applications? This is where User Pool Application Clients come into the picture. We discuss them in the next section.
User Pool Application Clients
According to AWS, a Cognito Appliction Client is “an entity within a user pool that has permission to call unauthenticated API operations“. This is a pretty meaningless definition that doesn’t tell you much.
I like to think of an Application Client as a literally a different application that wants to interact with (sign up, login) with your user pool. You may use one app client for your web app, and another for your mobile application.
Application Clients are created by the administrator of the user pool. Post creation, you are provided with a public client secret. This secret is to be used in all API interactions with Cognito. The secret is used to identify the Application Client and distinguish it from others.
Remember that in order for a User Pool to provide any functionality, you need at least one application client. This makes sense since a user pool without a client to interact with it is effectively useless.
You don’t need to know too much more about Application Clients. But if you’re curious you can read more about them here.
Once you set up your first application client, you now have access to the Cognito Hosted UI which is our topic for our next section.
Cognito Hosted UI
The Cognito Hosted UI is a website provided by Amazon Cognito that allows the user to sign up or log in to your User Pool. Each Application Client has their own URL to access your User Pool.
Note that you do not HAVE to use the Hosted UI to log in your users. If you are looking to build a custom front end experience that captures the user’s username and password, you can do so by calling specific Cognito APIs using the AWS Cognito SDK. For example, the InitiateAuth API as documented here allows you to submit user usernames/passwords. This option may seem attractive, but it is much more complicated than using the hosted ui. Reason being, you will need to also implement all other API interactions with cognito such as user sign up, password recovery, changing passwords, etc. All of this is handled for you out of the box if you use the hosted UI.
I would suggest folks avoid this approach unless they have a ton of time on their hands or explicitly require a custom login experience.
Setting up your Hosted UI looks something like the screenshot below
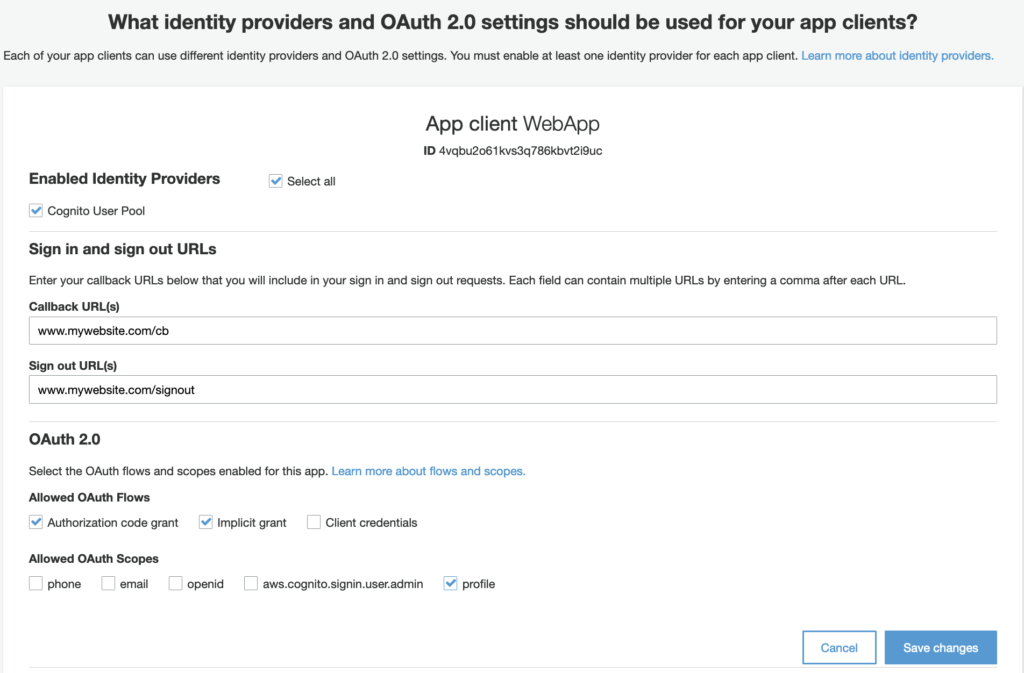
The selected Identity Providers is Cognito User Pool. This means that currently, the only way for the user to sign up and log in with your user pool is by registering as a user directly in your user pool. In other words, Cognito will act as the Identity Provider.
Another important section is the Callback URL and Signout URL. These are whitelisted URL endpoints that should be owned by your application. How the flow essentially works is that once a user successfully signs in with their credentials through the hosted ui, Cognito will redirect them to the specific Callback URL. In this case, www.mywebsite.com/cb. Added to the query string will be either an access token (if using the implicit grant flow which is not a suggested approach) or an authorization code (a more secure approach). Additionally, if you are using the profile and openid scope, you will get access to the user’s profile attributes such as name, email, and address. This data is provided through the Identity Token which is also returned post sign in.
I want to take a quick detour to explain the difference between Implicit Grant and Authorization Code Grant. Note that these are OAuth 2.0 concepts and not something specific to Cognito.
Implicit Grant Flow
In the implicit grant flow, the interaction between client and server takes on this form:
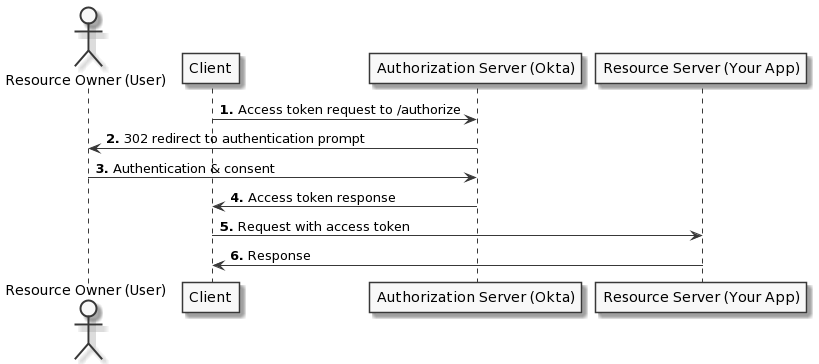
As you can see in the diagram, the flow is quite simple – just replace “Okta” with Cognito. Post authentication, Cognito will redirect your client to your application’s callback URL. Embedded within the query string parameters will be an access token. The access token is then used in subsequent calls to your backend APIs. Your backend then cross-checks the access token with Cognito before letting through the request. The downside of this flow is that the access token is directly embedded in the URL. This is a security vulnerability that makes it possible for bad actors (browser extensions, packet sniffers) to get access to your token. This can be a big danger.
The Implicit Grant is kind of outdated and no longer suggested as an approach to use. Instead, you should consider using the Authorization Code Flow/Grant which is described below.
Authorization Code Flow
The Authorization Code Flow is a slightly more complicated flow but has better security characteristics. An Image that describes (again from Okta) can be seen below.
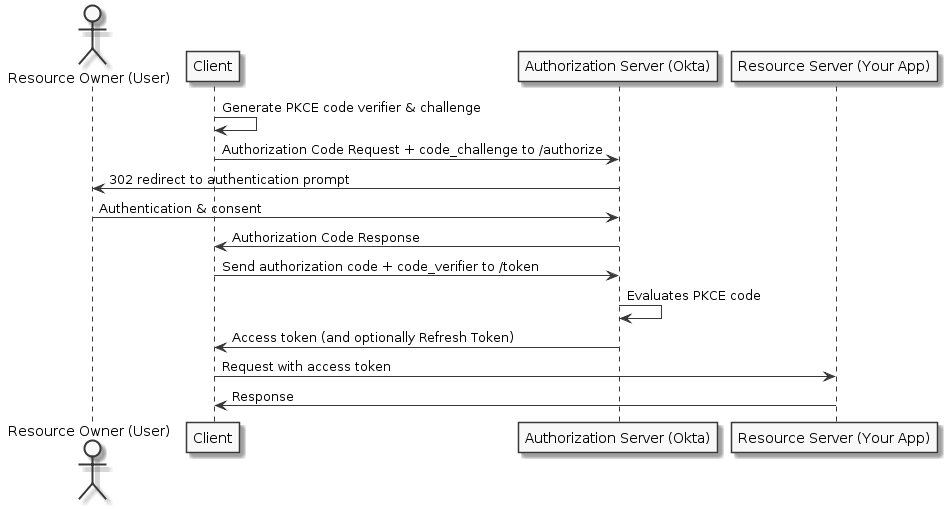
As you can see, there are more steps here, but the flow is much more secure. PKCE stands for Proof Key Code Exchange. It is a way to ensure that only the user who initially made the authentication request is the one that can exchange the authorization code for an access token. The presence of PKCE effectively guards against packet sniffers and rogue browser extensions.
In this flow, a PKCE code is generated by the client application (a random string). The user is then redirected to authenticate and provides the PKCE code as part of the request. The user signs in and is redirected back to the client application. Where this flow diverges from Implicit Flow is that the user receives an Authorization Code in the query string URL. The client application then calls back to the Authorization Server with the Authorization Code and the PKCE code, and it is exchanged for an Access Token.
The general guidance is to not use the Implicit flow and instead use the Authorization Code Flow.
One final thing to note is that both Access Tokens and Identity Tokens are JWTs or JSON Web Tokens. The tokens themselves are encoded strings that once decoded, contain information about the user’s access rights (for access tokens) or the user’s identity (for identity tokens). You use common libraries to convert JWTs to a JSON object where you can extract the value. For example, here is what a decoded Identity Token looks like:
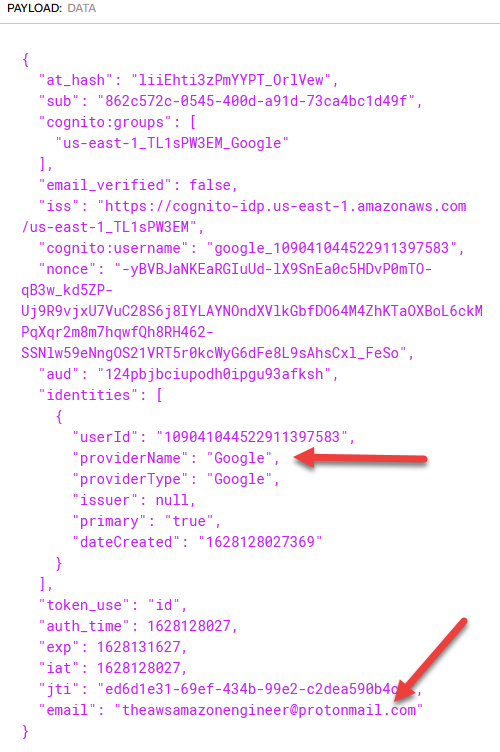
Note that much of what I’m describing here in terms of Access Tokens, ID Tokens, Authorization Codes, etc etc are related to OAuth 2.0 and OpenID Connect. If you’re confused about any of this, by far the best resource I’ve come across to learn OAuth 2.0 fundamentals is this YouTube video. Since this is an article on Cognito and not so much OAuth 2.0 fundamentals, I’d highly encourage you to watch the above video to clarify how it works.
I hope this brief summary has been useful. Anyways lets move back to the final step of setting up our application client.
The final option is specifying Allowed OAuth Scopes. This simply refers to which details are returned back to the caller via the authentication process. More details on this here.
After Saving your Changes, you now have the ability to actually create the hosted UI as seen below.
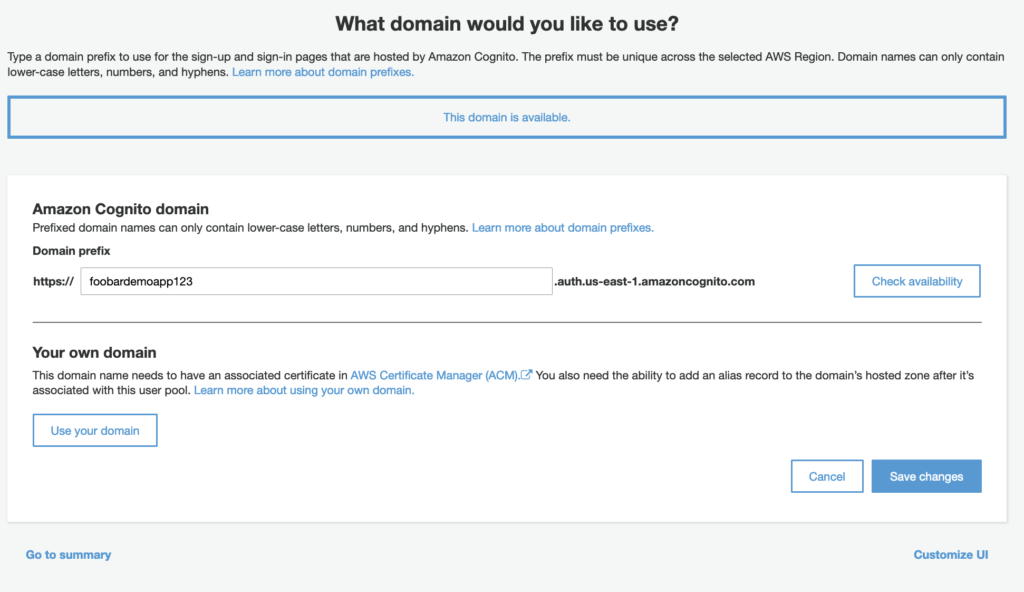
You have the ability to specify your URL name that has an AWS related suffix. If you would like to use your own domain name you will have to create a certificate in AWS Certificate Manage (ACM) and link it to Cognito. Note that if you choose the former option, the name of your domain prefix must be globally unique. In other words, two users, even if they have different AWS accounts, cannot share the same domain prefix.
After clicking Save Changes and visiting the UI, you will see a screen like below:
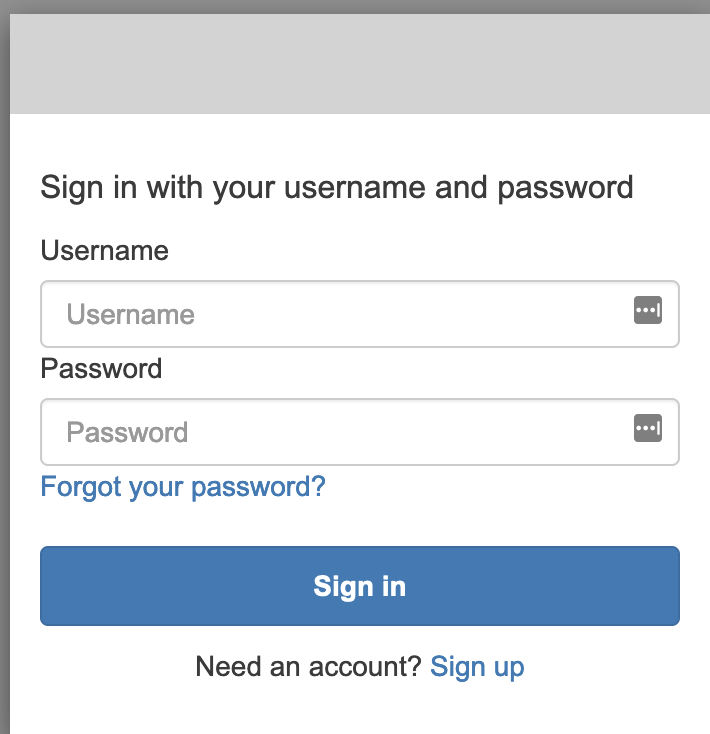
This is a pretty bland looking login experience. Note that you can customize the Hosted UI with custom CSS, logos, and other details through the Cognito Console. This allows you to create a more attractive and familiar experience for your users that is app specific.
Adding Social Sign On Providers to Your Hosted UI
Out of the box, Cognito supports registration and sign in for users that have accounts directly within Cognito. A common sign in method these days is Social Sign On. You can essentially use your Google Account to sign in with a third party application. This method is convenient for the user since it reduces the friction they have to run through to start using your app.
From the cognito perspective, you can add other Social Sign On providers to your user pool through a relatively quick linking process. In fact, I have quite a detailed article on how to associate your User Pool’s app client with Google to provide Social Sign On. You can check it out here.
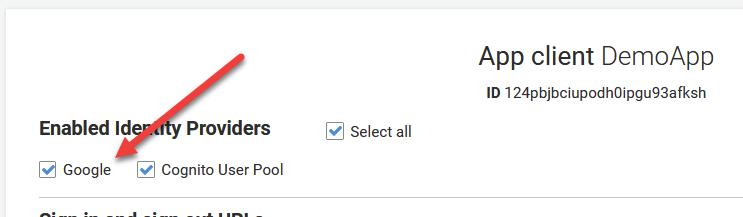
After you configure your social sign on provider, you’ll have the ability to add it as another Identity Provider as seen below.
And moving back to our hosted UI, you will now have the option to sign in using Google as seen below.
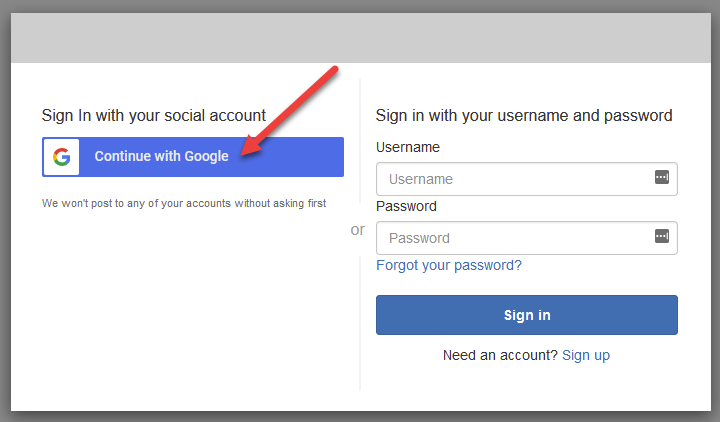
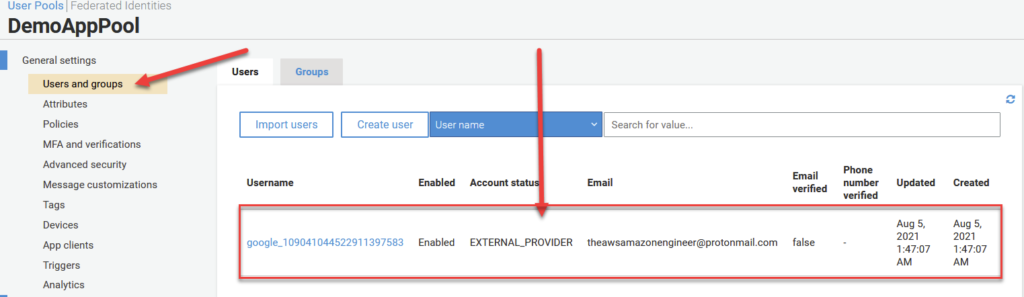
And after the user signs in, here is what shows up in your User Pool directory.
Triggers
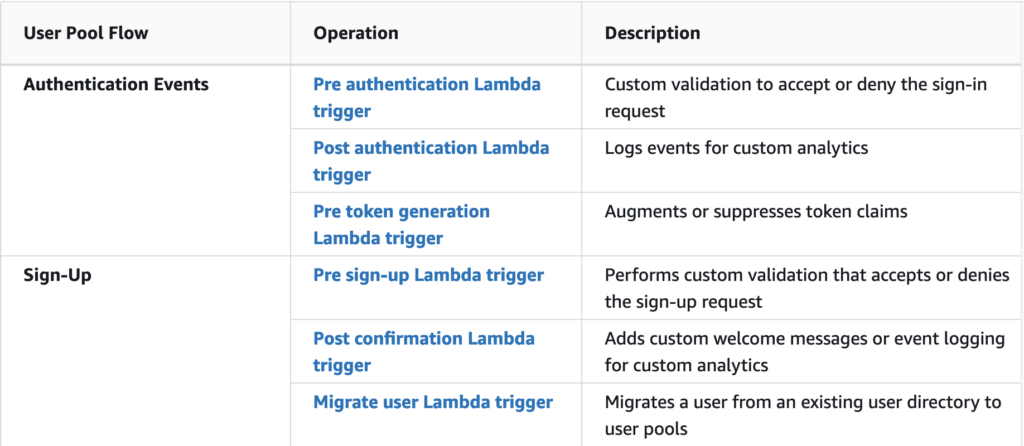
Triggers are a feature of Cognito that allow you to run custom code in response to certain sign in / login related events. The feature allows you to link a Lambda function to multiple event types and trigger them when the event in question occurs. Here’s a quick table of some of the event types that are available for your to hook into. You can see the full list here.
There are many purposes to use triggers. But broadly speaking, they allow you to add custom business logic to your application when an event type fires. For example, say we are trying to add an additional piece of data in our claims after the user signs in. We can potentially add a Post Authentication Lambda Trigger and within our Lambda function, call a offsite database. We can then use the response to inject additional metadata into the claims section of the response.
The key to this is that triggers provide an input object to your Lambda object that contains context about the user signing in. The can then update the input event object and return it back in your Lambda function. The full decorated objected will then be provided back to the user in the form of the token. Note that the exact event input/output depends on which event trigger you are hooking into.
You can learn more about what triggers are and how to use them here. They are kind of a more advanced feature but for complicated use cases requiring custom business logic, they may be just what you need.
Groups
Cognito offers you the ability to categorize users into Groups. You can “use groups to create collections of users to manage their permissions or to represent different types of users”. You can also use Groups to base specific business logic in your applications.
You can also tag IAM roles with groups to create specific permissions for sets of users. For example you can create a “Student” group with a restricted permission set. And you can create an “Instructor” group with a more relaxed permission set.
There is also a concept of group Precedence which is a integer value that is used to resolve cases of a user belonging to multiple groups.
One final thing you can do with Groups is communicate membership back to your application through the claims. Sent back to the user through the Access Token is an encoded cognito:groups tag that contains all groups hat the user belongs to. You can use this list to create custom application logic for different types of groups. In later sections, we show how to pick specific IAM roles based on a user’s group membership in order to control different access levels to AWS services. This is covered in the Identity Pool section.
Managing Access to Server Side Resources with User Pools
When initially introducing User Pools at the beginning of this article, we discussed how they can be used to provide user login (authentication). However, User Pools can also be used to manage access to server side resources. In other words, this method allows you to protect your API from being used by users who have not logged in with your Cognito Userpool. This is a very popular requirement for any app that hosts sensitive user data.
There are two key ways to accomplish this depending on your backend setup, so let’s run through them now.
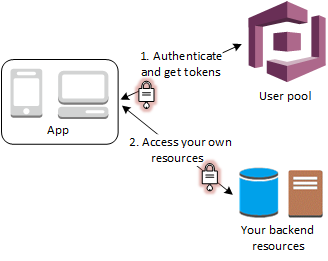
Method 1 – Custom Backend
This method is applicable for those of hosting a traditional backend using a Webserver. Say for example, you’re hosting a REST API on a NodeJS backend that calls a database. Your backend does not necessarily need to be hosted on AWS. You can certainly have a backend on GCP, Azure, or even on-premise machines. In this world, you will only want authenticated users to be able to successfully call your backend APIs.
One key step that is missing from this flow is that your Backend needs to cross-check the provided access token with Cognito provided keys to ensure it is valid. This prevents bad actors from forging fake access tokens and attempting to access your API. You can see how this is done here.
Method 2 – API Gateway + Lambda Authorizer
This method is for users using API Gateway + Lambda functions to host their REST/HTTP APIs. AWS offers a convenient way for you to validate an access token for a user to ensure it is valid before routing the request to your APIs. In other words, only authenticated users with a valid access/identity token will be able to interact with your backend. This is automatically handled for you and I actually have a video on how to set this up on my YouTube channel here.
A visual representation of this flow can be seen below.
Application Integration Options
So far, we learned about how User Pools and Federated Identities work. But how does an application developer integrate their user pool with their application? For example, in a typical application you will want your user to sign in, and perhaps grant them the ability to upload a file to S3. How does your application actually hook into Amazon Cognito?
It turns out, there are two distinct ways to integrate:
- AWS Amplify Framework
- AWS SDKs
AWS Amplify Framework
The Amplify Framework is a way for web and mobile application developers to quickly build their application on AWS. It involves using the Amplify CLI to add resources such as APIs, Databases, and not suprisingly Authentication/Authorization. That last bit is powered by Amazon Cognito.
Part of the reason some developers like to use Amplify is that is abstracts away the details of using AWS. Instead, developers can focus more on high level building blocks and use them to build their applications. The interesting bit about amplify is that behind the scenes, it interacts with many AWS services and provisions resources from them – it just hides this from you as a user.
If you choose to use the Amplify Framewoork and use Cognito, its a very straightforward process. You literally use a command something akin to amplify add auth and it will create a user pool for you. Amplify also comes with front end facing user libraries that make it easier to interact with AWS services (including cognito) on the backend. This way, you don’t need to call AWS APIs directly and can instead use their SDK to perform common functions. In our case, this includes signup, login, etc.
If you’re interested in learning more about AWS Amplify, you should check out my Amplify Overview article here.
AWS Cognito SDK
Amazon has a SDK that provides access to Cognito specific features. The exact SDK you use depends on your programming language of choice. However the SDK lets you perform functions such as sign up a user, sign in, start the password recovery flow, etc.
You can learn more about the Cognito SDK here.
Recap Cognito User Pools
Phew – that was a lot of information about Cognito User Pools. Lets quickly summarize what we’ve learned so far.
- Cognito User Pools at their heart are User Directories.
- Users can either sign up / log in directly within Cognito, or use a Social Sign On provider
- Application Clients are used to separate specific applications that would like to allow the Users in the User Pool to access their application.
- Cognito offers a Hosted UI that allows users to sign in and get redirected back to your application.
- The Access Token returned by Cognito must be provided to Backend APIs and validated with Cognito before performing the APIs function. Note that is not needed if using API Gateway + Lambda with a Cognito Authorizer.
- You can interact with Amazon Cognito either by using the Amplify Framework or directly via the AWS SDK.
At this point you should have a pretty good understanding of what User Pools are and how they work. Lets move on now to talk about Federated Identities and how they fit into the picture.
Federated Identities in Detail
As we briefly touched on earlier, Cognito Federated Identities allow you to assign IAM roles to users. These roles will allow the user to access specific AWS resources / APIs.
Interaction with Identity Pools looks like the following. Note that this is the Enhanced Flow and is suggested to use by AWS over Classic.
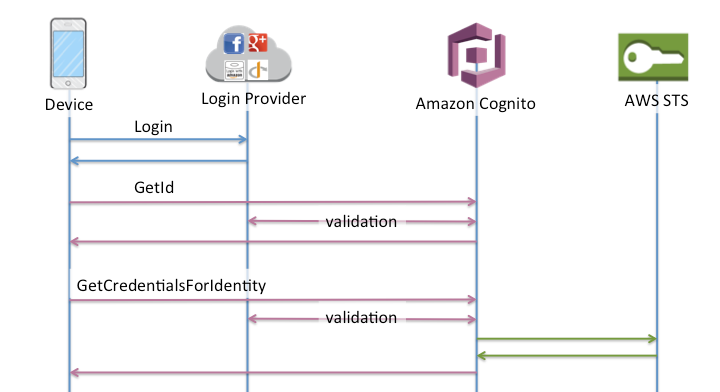
This flow involves:
- The user initially logs in their Identity Provider and is issued an Identity Token
- Your Client application calls the Cognito GetID API and exchanges the Identity Token for an Identity ID.
- Your application then calls the GetCredentialsForIdentity API which validates the Identity ID, and responds with AWS Access Credentials that are tied to an IAM role.
- Your client application then uses the credentials to call AWS services.
This is the basic flow of Cognito Identity Pools. Lets dive in now to what it looks like to create an Identity Pool, and the types of customization you can apply to them. Lets start with Creating an Identity Pool.
Creating an Identity Pool
The first step to use an Identity Pool is to create one. When you initially set up a Identity Pool there are many settings you as an administrator need to specify. This includes things like:
- The Identity Pool Name.
- Whether or not you want to support “Guest” users with limited access credentials.
- Whether you want to use the Classic or Enhanced authentication flow (Enhanced is recommended)
- Which Authentication Providers you want to support (Cognito User Pool, Google, Facebook, Apple, etc).
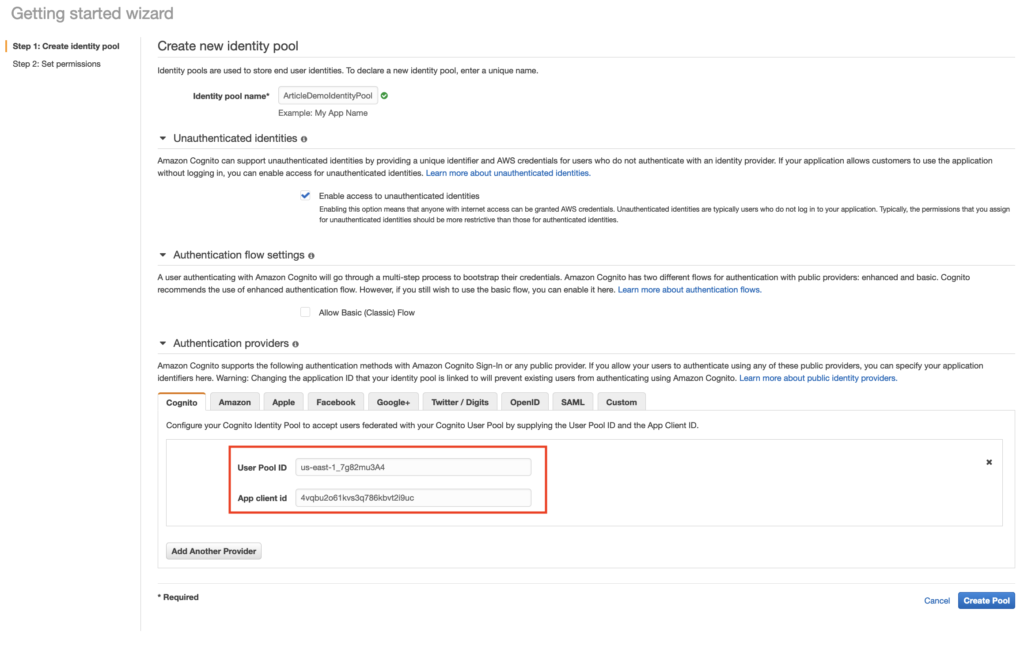
The screenshot below highlights some of the settings you need to specify. Notice in the screenshot I am linking the Cognito User Pool created as part of an earlier step in this article. In order to do so, I provide the User Pool ID and the App Client Id.
The second step of creating the Identity Pool is to specify which IAM roles the authenticated user will have access to as seen below.

Notice here that since we enabled Guest Access during the previous step, we now need to supply both the Default IAM role to us for both Authenticated and Guest users. When users attempt to access your Identity Pool, Cognito will automatically detect if the user is authenticated or not and respond with the correct role credentials.
We now have a fully functioning Identity Pool that can be programmatically accessed and grant temporary access to users. But what if we want to be a little smarter in terms of selecting a role for our users. Say for example we want the role selection to be based on some kind of user attribute or “claim” in the Identity Token such as a Group claim that we assigned in our User Pool.
It turns out we can accomplish this by modifying our IAM role selection using Rules.
Authenticated User IAM Role Selection
Part of the neat thing about Identity Pools is that it supports dynamic selection of roles based on user identity token attributes. In order to set this up, we can Edit our Identity Pool’s Authenticated Role Selection as seen below.

And this, my friends, is where the magic is at with Cognito Identity Pools. The ability to dynamically assign IAM roles based on Identity Token attributes is an extremely powerful ability. And even better, we can combine this with User Pool Groups and Triggers to inject custom attributes into our Identity Token claims. Using this recipe, you can build powerful applications that have granular access controls based on the user’s identity.
“And this, my friends, is where the magic is at with Cognito Identity Pools. The ability to dynamically assign IAM roles based on Identity Token attributes is an extremely powerful ability. And even better, we can combine this with User Pool Groups and Triggers to inject custom attributes into our Identity Token claims. Using this recipe, you can build powerful applications that have granular access controls based on the user’s identity.”
As an alternative to using properties from our Identity Token to assign IAM roles, we can instead use IAM policies to control access to AWS resources. More on this below.
Attribute Controlled IAM Policies
IAM policies are documents in AWS IAM that specify what a user has access to. It defines things like which API a user has access to, and user-specific controls through the Principal.
For example, assume we want to restrict a user’s ability to only read/upload documents from S3 when a user is part of a certain department (with the department being defined in our User Pool and returned as part of our Identity Token).
To do this, we can create a custom mapping in our Identity Pool that ties the token attribute name to the name of the identifier used in the IAM Policy.
I don’t have too much to add in this area besides what’s already available in the AWS documentation on the topic. But just know the gist of it is that we can use values from our ID token to produce even more granular IAM policies and apply them to our user’s access credentials.
Recap Cognito Identity Pools
Phew – we made it. Let’s quickly recap what we learned about Identity Pools.
- Federated Identities / Identity Pools allow users to acquire AWS access credentials to directly interact with AWS services.
- You can use your Cognito User Pool as an authentication provider or other Social Sign On Providers
- You can also enable Guest access with more restrictive IAM access
- You can dynamically select IAM roles to use either by using attributes from the Identity Token and map it to an IAM Role, or use the attributes to craft user-specific IAM policies.
Bringing It all Together
This article has dumped a lot of Cognito specific and even more broad Authentication/Authorization concepts on you. The thing to remember here is that User Pools are designed to be user directories and Identity Pools / Federated Identities allow access to AWS services via IAM credentials.
You can choose to use just a User Pool, or decide to tie your User Pool to an Identity pool. Whichever option you choose, you have a powerful Authentication/Authorization provider to work with when using Amazon Cognito.
I hope this article has helped you understand Cognito fundamentals. It’s been a pleasure to write and I hope this post supplements your understanding of what Cognito is capable of.
If you have any comments or questions, please feel free to drop a line below.
And finally, if you enjoyed this article, please make sure to share / link it around the web. It will help me tremendously.


Excelente artículo, muchas gracias por compartirlo! 😀