


Logging into your favourite app using your Google, Facebook, or Amazon credentials is now an expectation for modern applications. The benefits of configuring your app to support Social Sign On (SSO) are well documented and include benefits such as streamlined signups, greater app adoption, and less password reliance.
The benefits of SSO using identity providers are clear, but how do we go about adding SSO support such as Google’s to our AWS application?
We’re going to leverage Amazon Cognito – AWS’ generic access control service. It allows administrators to create user pools that govern access to their applications. Using Amazon Cognito’s interface, it’s very easy expand your options for login from a username and password combination, to using Google, Facebook, or Amazon SSO providers. By the way, if you’re looking for a complete beginner guide on Amazon Cognito, check out my comprehensive beginner guide here.
In this article, I’m going to walk you through the steps needed to add Google Social Sign On to your Amazon Cognito User Pool, allowing your application users to sign into your app using a users existing Google credentials.
Although in a production usecase I would suggest using Infrastructure as Code, I typically suggest doing it the first time through the console to help you see the moving parts in motion. In this post, we’re going to be using the AWS Console.
So lets get started.
Prefer a video instead? Check out my YouTube video on this video here:
Prerequisites
You’re not going to need much for tutorial, all you need is
- An AWS Account
- A Google/Gmail Developer Account with Access to Google Cloud Platform (to check, try visiting the GCP dashboard using this link )
- A bit of knowledge of OAuth2.0 – for those out of the loop, Cognito uses OAuth2 protocol to authenticate users as part of the login flow. Learn more about it here.
Step 1 – Creating Your Amazon Cognito User Pool
Background Info on Cognito User Pools
In order for us to add any form of authentication or authorization to our app, we first need a Cognito User Pool. A User Pool is essentially a collection of users that are currently known to your system. You can add users to your pool either directly through a custom Amazon Cognito UI, or by using a Social Sign On provider (such as google) to federate.
Note: the term Federate simply refers to the ability of a user to use an account existing in a different system to login to your user pool.
This also means a human person can have multiple accounts in your user pool. This in itself isn’t a problem, and its certainly a common place to have multiple accounts in many ecosystems such as Google, so don’t get hung up on it. However, if you’re expecting your user pool to represent a unique human per entry, that would require custom “identity linking” which is beyond the scope of this article.
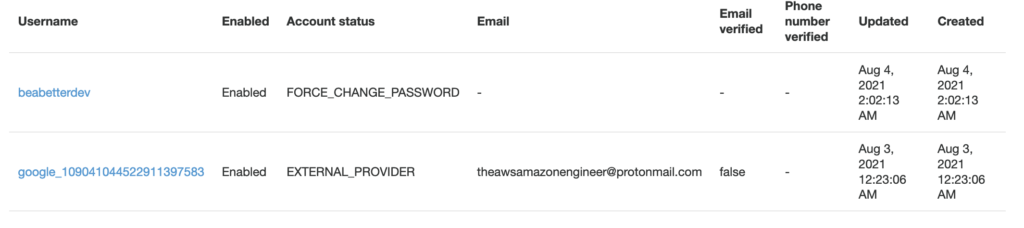
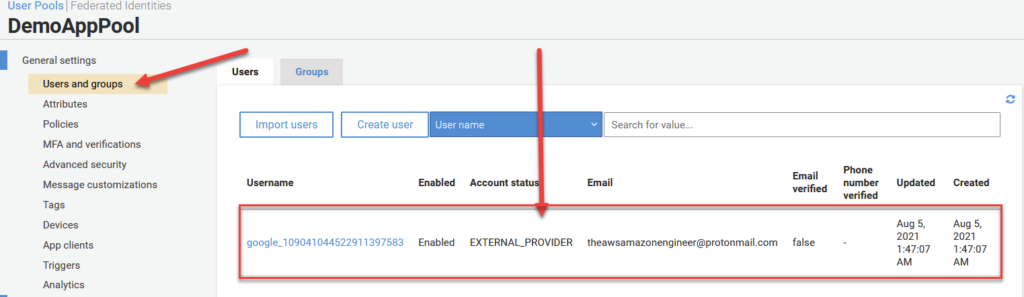
Carrying on, below is a screenshot of a User Pool‘s users in a Demo pool I just created. The top being a user I created with a default username and password, and the bottom being an account created as a result of logging in via Google using Social Sign On.
Creating the Pool, Step by Step
To create our User Pool, head over to the Amazon Cognito section of the AWS console. You should see a screen similar to what I have below. Go ahead and click on Manager User Pools to get started.

On the following screen, you’ll want to go ahead and click on Create a User Pool in the top right of your screen as seen below.
This is going to launch the User Pool creation wizard. Initially we just need to give our application a name and decide whether or not we want to accept the default settings, or step through each one by one and do some customization.
We’re not going to walk through each of the individual settings in this video, but I encourage you to go through them on your own time. They allow for customizations such as password strength, enabling Multi-factor authentication (MFA), and using Lambda to create ‘hooks’ at different stages of the OAuth2.0 login flow.
These extra features are what make Amazon Cognito so popular, but to keep things simple in this article, we won’t mention those details unless necessary for this tutorial.
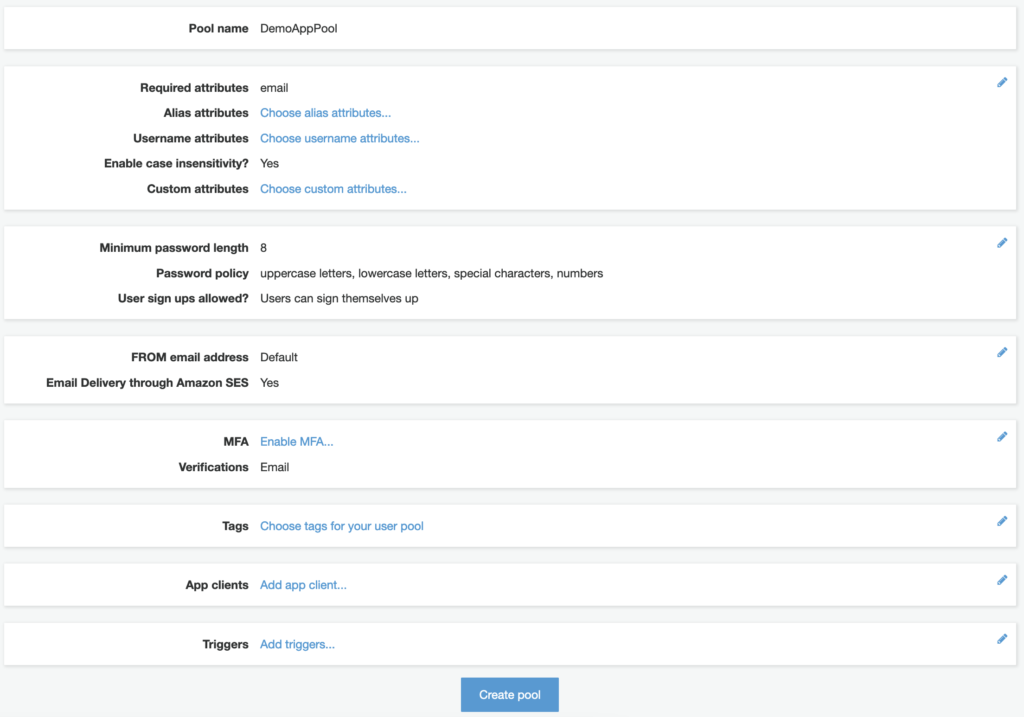
To move forward, I’m going to call my pool DemoAppPool and click on Review Defaults below. After doing so, you should see a summary screen like the one I have below.
Clicking Create Pool should result in a confirmation message as seen below. Congrats! You just created your first User Pool!

This pool doesn’t do much right now at all. So lets progress by adding an App to our User Pool.
Step 2 – Creating Your Amazon Cognito App
First Things First – What is a Cognito App?
In order to answer what is an App or Application in Cognito’s context, we need to understand a concept called Multi-tenancy. Multi-tenancy is basic idea that we can create a single piece of software + infrastructure that serves multiple different customers.
Cognito User Pools can leverage this concept of multi-tenancy by serving multiple different applications at once using the same User Pool. This can be great for companies that want users to only have to create an account once, and be able to use that account all over the companies ecoystem.
It turns out that in order for a Cognito User Pool to be useful, we need to have atleast one configured application. So lets quit the talk and get one set up.
Creating the Application
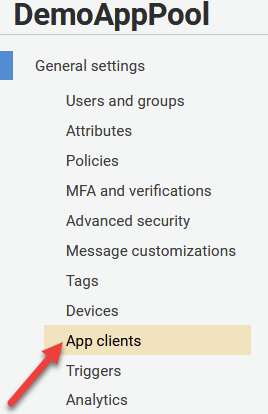
On your left hand navigation pane, click the tab called App Clients under the General Settings tab as seen below.
On the next screen, click on Add an app client.
From here, we’re prompted with a bunch of options to configure our application client. Go ahead and pick an App client name and fill it in the first box. I’m calling mine DemoAppClient.
I’m going to leave most of these settings as default here. I’ll let you explore them on your own time. Just note that these settings are app client specific and can be changed even after you create your initial client – so don’t worry too much about the details for now.
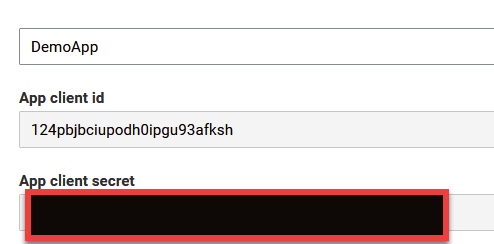
Go ahead and click on Create App Client at the bottom of the page. You should now be greeted by a new page presenting you with your App Client Id and Secret Key. This is going to be important later when we set up our google integration.
Step 2 – Creating Your Amazon Cognito Domain Name
In this next step, we need to set up a Cognito Domain Name. This is going to be useful to act as a sign in portal for users that want to access your application. Its at this domain that the user will be presented with the ‘Sign In With Google’ button.
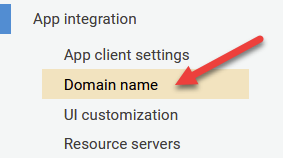
To get started, click the Domain Name option under the App Integration section of the menu bar, like seen below.
On the next page, you have an important decision to make. Do you want to use Amazon’s provided URL for clients to login? Or do you want to set up your own?
Typically, most professional folks that really care about the optics of their application will go ahead and use their own domain. This is not that difficult, but annoying enough that its something you’ll avoid unless absolutely necessary.
Since this tutorial is about simplicity, I’m opting for the first option which is to use an Amazon Provided Domain Name.
Picking a Domain
Picking a domain is pretty straight forward – generally just pick something related to your application. Perhaps a name or functionality. Do remember though that no upper case or special characters are allowed beyond numbers or hyphens.
Note though that whatever name you choose, it needs to be Globally Unique. In other words, two people, even if they have different AWS accounts, cannot share the same domain name. For reasons pretty obvious, URLs are globally unique, so in turn, so must be our domains.
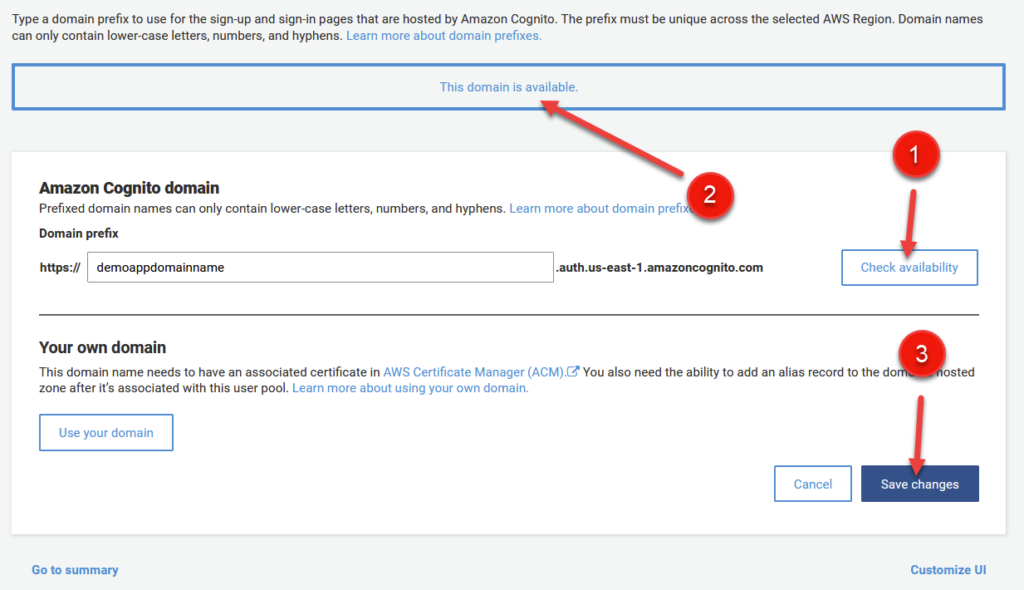
You can click on the Check Availability button (1) to see if your domain is available before committing. A confirmation message (2) will indicate the name is up for grabs.
After reviewing the page, click on Save Changes (3) in the bottom right.
Our domain is now accessible! To check it out, click on the App Integration option on the right hand side of the menu to find our login domain. mine is https://demoappdomainname.auth.us-east-1.amazoncognito.com (Note, this URL will not be accessible by the time this article is posted, so don’t worry if it doesn’t work).
Do note though that if you try to visit your domain initially, you’ll be greeted with a Blank Page. Hmph, that isn’t right. But don’t fret! This is intentional. First, we need to muck with our App Client Settings to tell Cognito to leverage our User Pool for this UI.
Step 3 – Integrating our User Pool and App Client
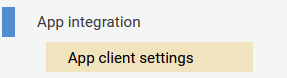
To begin, click on App Client Settings on the left hand menu under App Integration as seen below.
We’re greeted by a complicated menu with a whole bunch of options. So lets briefly touch on what all of this stuff is and what we need to change.
Firstly, as seen in (1) below, click Cognito User Pool under Enabled Identity Providers. This will tell cognito to use your User Pool that you just created as a source for your application. When we add Google as our Federated Identity Provider later on, we’ll have to come back to this menu to select it as well. But for now, selecting Cognito User Pool will do.
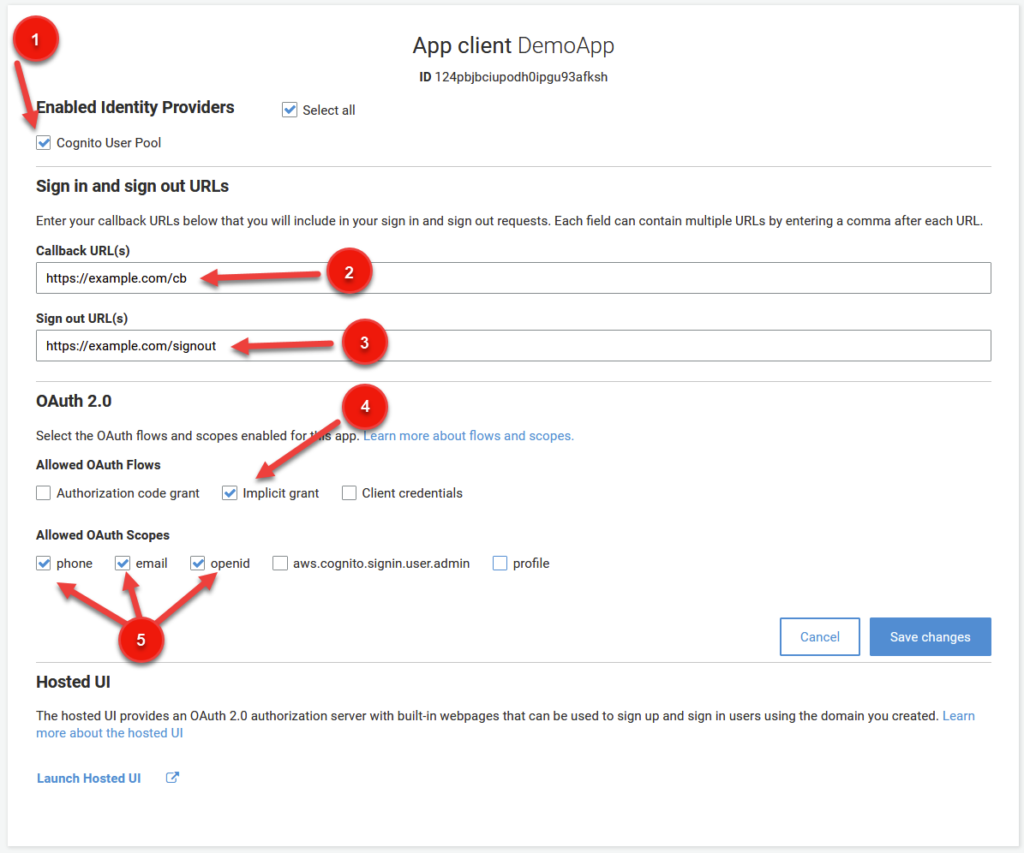
For (2) and (3), we need to enter a Callback URL and Sign Out URL. These requirements are kind of specific to the OAuth2.0 protocol, so I won’t discuss them ad nauseum here. But basically, the callback url is an endpoint that your application will be redirected to after successful authentication. Embedded in the url will be a JWT (Json Web Token) that contains information about the user, also known as claims (which need to be filled out below). These claims can be used by your application to discover attributes about the user including firstname, lastname, and other attributes.
So using the example domain from above in (2) – after a successful login, your user will be redirected to a URL that looks like https://example.com/cb?auth_token=<GENERATED_JWT_TOKEN_HERE>. You can use a library in your language of choice to decode the information and store details in cookies for subsequent login. Pretty cool!
Sign out URL follows the same principles, but is dedicated to Sign Out functionality.
You don’t NEED to fill these values in right now, but this is basically how you’re going to get confirmation on your application end that a user has successfully signed in. You can always come back here later to change the URL in case you’re not sure of what its going to be.
I want to take a quick pause to discuss some more details about OAuth2.0 flows. I feel that this information is relevant for this discussion to understand the basic principles of how tokens are generated and exchanged to authenticate users. Feel free to skip this section if you’re already familiar with OAuth2.0 flow fundamentals. I personally think this is a nice brief refresher, even if you already know how it works.
OAuth2.0 Flows – Authorized Code Grant, Implicit Grant, and Client Credentials
Next, we need to decide on what type of OAuth2.0 flow(s) we want to use. Each type, Authorized Code Grant, Implicit Grant, and Client Credentials are useful under different circumstances. Here’s a brief summary of when to use what:
- Authorized Code Grant – This flow relies on a third party, usually a backend server, to communicate with Cognito to verify the authenticity of a token provided to a client upon successful authentication. This token, provided to the client, is called authorization code. This code is then sent to your backend, where it is combined with a secret key, known only to your backend, to be confirmed with Cognito. Upon successful confirmation, Cognito issues a id_token and access_token which contain details about the user and authorization permissions respectively. This is a preferred solution when a backend is available to confirm the token, since it prevents Man In the Middle (MITM) attacks. However, a backend isn’t always available, which brings us to #2.
- Implicit Grant – When there is no backend available to double-check our token, such as in a staticly hosted react app or mobile application, we must rely on a different protocol called Implicit Grant. Implicit grant is similar to Authorized Code Grant in that an id_token AND access_token is sent back directly to the user after authentication. The client can then immediately take this token and use it to access restricted resources. Do note that since there is no ‘double checking’ going on at the backend, a token can be potentially intercepted during network communications by a bad actor, and used to access secured resources. This pattern is not ideal, but
- Client Credentials Grant – This third case is more straightforward – it is used to provide access credentials for a specific application as opposed to a specific user. Think granting permissions between two services such as CreditCardService which wants to call BankingService. In this flow, CreditCardService calls Cognito to obtain an access token. It then calls BankingService providing the access token as party of the Bearer HTTP header. Banking Service double checks this token is valid by calling Cognito, before finally providing access to its protected resource. Not really applicable in this demo, but good to know overall.
For more information on code grant types, I highly suggest this great resource from AWS which goes through the specifics of each flow. In fact, its where this beautiful image from below is sourced.
Before proceeding, make sure you set Implicit Grant flow from above as seen under (4).

Carrying On… Setting Our Scopes
Scopes (5) are essentially a lists of identifiers that indicate what access priviliges are being requested. There are a couple of well known scopes such as profile, email, address, and phone. Within the profile scope, there are claims, which as a reminder, are key/value pairs describing attribute information about a user.
In general, a scope is a request to a group of resources, and a claim is an entry that consists of a key/value pair for that scope.
For our Demo, we only really want to provide access to a couple scopes: phone, email, and openid. So go ahead and select those three options before clicking on Save Changes below. Be sure to check the reference image at the beginning of this section to make sure your configuration matches mine (except for callback urls, if applicable).
Voila, Our Hosted UI Now Works!
Affter clicking Save Changed from above, you should now see clickable text below that says Launch Hosted UI. If all went well, you should be greeted with a sign in page similar to the following:
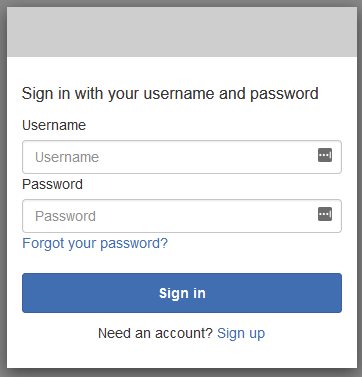
Woo hoo! We’re almost there (kinda). Notice though we don’t have an option so sign in with our Google Account. Big bummer! Lets get that sorted out in our next step.
Step 4 – Configuring Our Google Integration
At this point, we need to connect Google to Amazon Cognito so that a user can sign to our Cognito User Pool using their Google credentials. To do that, we need to configure an application in our Google Developer Account and do some initial configuration.
To start, head over to the google developer console and sign in.
Creating Our Google Project
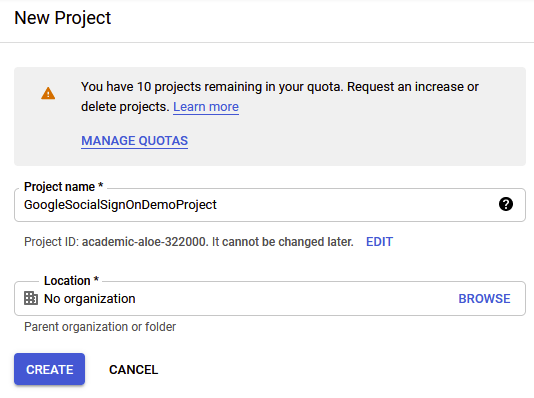
First things first, we need to Create Our Project. To do so, click on the dropdown in the top left as seen in the image below.

In the following screen, click on New Project in the top right, and provide a name for your project as seen below. Go ahead and click on Create.
Note: Before advancing, go ahead and click on the dropdown from an image above and select your project. It turns out, it doesn’t do this by default after creating your project initially.
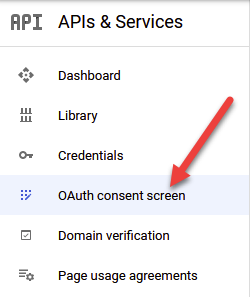
From here, we need to configure our OAuth2.0 Consent Screen.
Configuring Google OAuth Consent
OAuth Consent is the form that 99% of us skim over when we’re attempting to log in with our Google Credentials. Its the thing that says “Foobar App would like to access your name, email, contacts, and YOUR SOUL (just kidding on the last part), would you like to consent”?
It turns out there’s some customization to do in this area, so lets head over to the Oauth Consent screen to set it all up by clicking the item on the left hand menu bar as seen below.
Initially, we need to decide between an Internal and External application. For now, its fine to use External just to do some testing and wire everything up. However, if you want to move to production, you’ll need to come back and change this to Internal, and follow the corresponding verification steps imposed by Google.

The next page asks us for a bunch of settings that we need to configure.
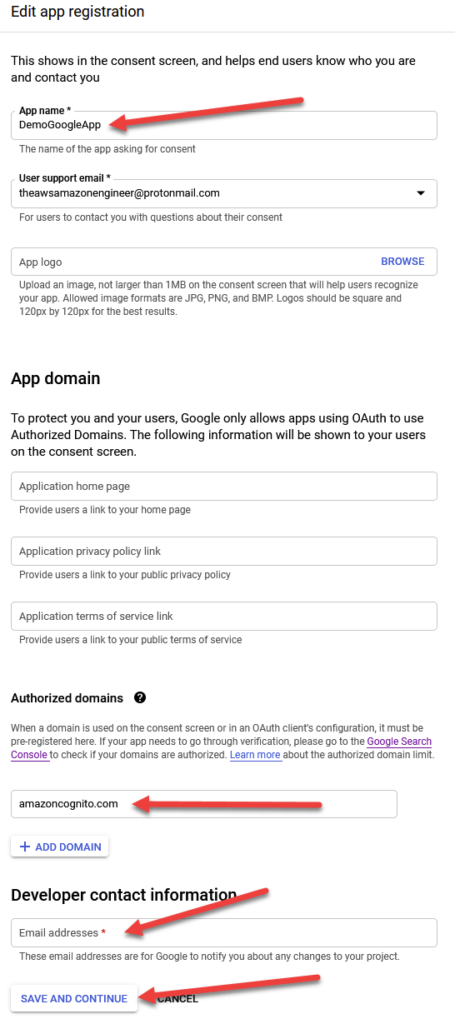
Firstly, provide an App Name. This is a required field and will be shown to users when asking for Consent, so pick a good name. You certainly don’t want something like ‘fhsdjkfhsdjkfhsdjk application wants to get access to your email’, so pick wisely and look professional. I’m going to call mine DemoGoogleApp.
Next, provide your email (also a mandatory field), and optionally, your website logo. The logo will also show up as part of the consent flow.
Leave everything under App Domain as default (blank). It isn’t required unless you want to provide the additional context.
Under the Authorized Domains submenu, click on the ‘ + Add Domain ‘ text and enter amazoncognito.com. DON’T FORGET THIS PART YOU’RE GONNA HAVE A BAD TIME! (I speak from experience).
Finally, put in your developer email address and click Save and Continue. A screenshot of my configuration can be seen below:
Click Save and Continue two more times until you land on the Summary Page to confirm the details of your application.
Great, so we’ve created and configured our Consent page, now we need to get a secret key from Google to share with our Cognito User Pool.
Creating a OAuth2.0 Client ID
We’re almost done with google setup, don’t worry. But first we need to go ahead and create a client ID to share with our Cognito application. To do this, click on the Credentials menu option on the left hand side of your navigation page, as seen below, and afterwards, click on ‘ + Create Credentials ‘ located at the top of your screen next to the Delete button.
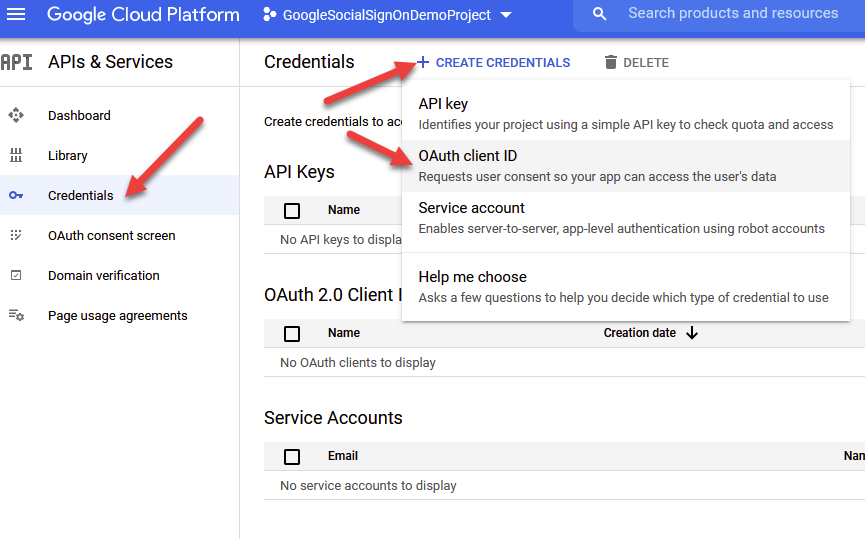
In the subsequent dropdown, click on OAuth Client ID to proceed.
We need to fill out some relevant details here, so I’ll provide an image with number references as seen below.
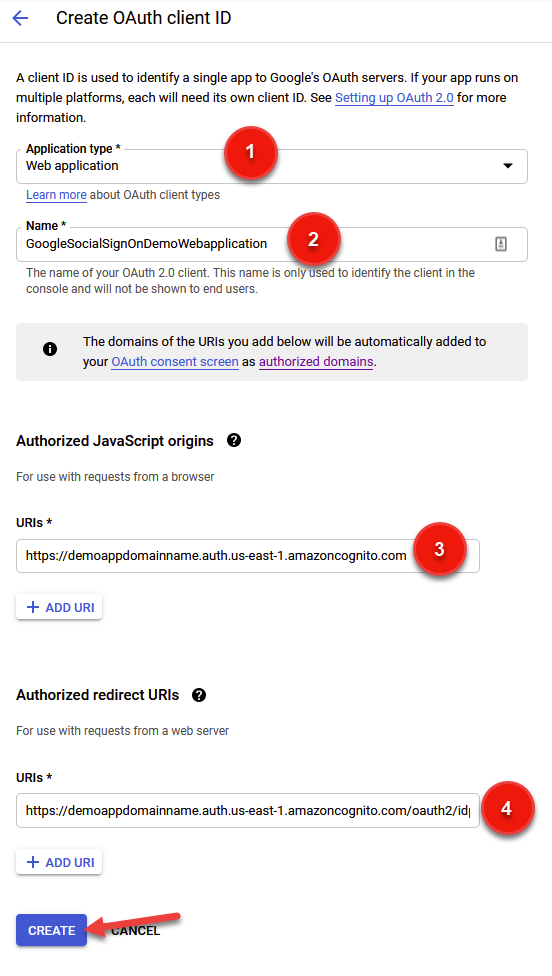
Firstly, as seen in (1), we need to select our application type. We can have many different application types including web, mobile, and others, so pick the one most relevant for you. You can always come back here later and add a new type.
Next (2), pick a name. No explanation here really, just make sure its descriptive enough for your liking.
Third (3) we need to provide Google with our Authorized JavaScript Origins URI. Google is essentially asking us: from what domain should I expect to be as the origin when receiving an authentication call? To find out the right value, we need to head back to our Cognito User Pool and find our Domain URL.
To do that, click on App Integration under our User pool and find our domain, as seen below for my application.
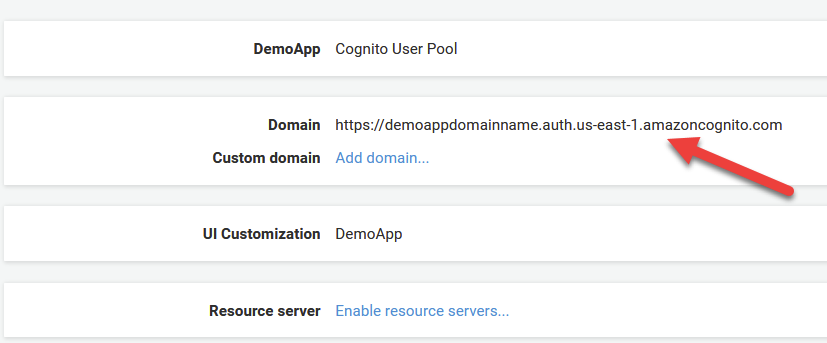
Take this value, and paste it into your prompt for Authorized Javascript Origins as seen in the numbered image above (3).
Finally, we need to do something similar for the Authorized redirect URIs text box. Once again, paste in your domain name, but add /oauth2/idpresponse to the end of it. Go ahead and click on Create to proceed. But before you do, better to double check your inputs against mine in the reference images above.
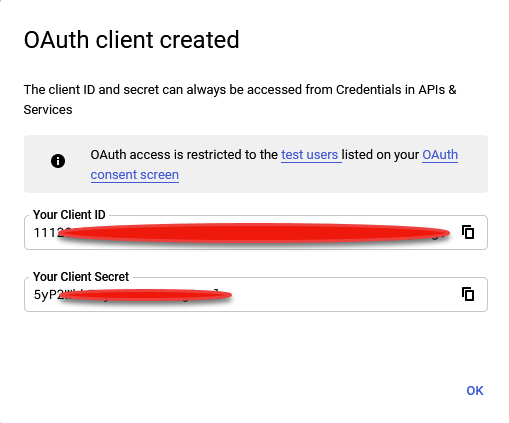
Woohoo! you should now be greeted with a confirmation page providing your Client ID and Client Secret as seen below. Save these values in a notepad because we’re going to need them in our next and (almost) final step: connecting our Google IDP to Cognito.
Step 5 – Configure Google as IDP For Our User Pool
We’re almost there – just a couple more steps I swear.
Adding Google Keys to Our Cognito Pool
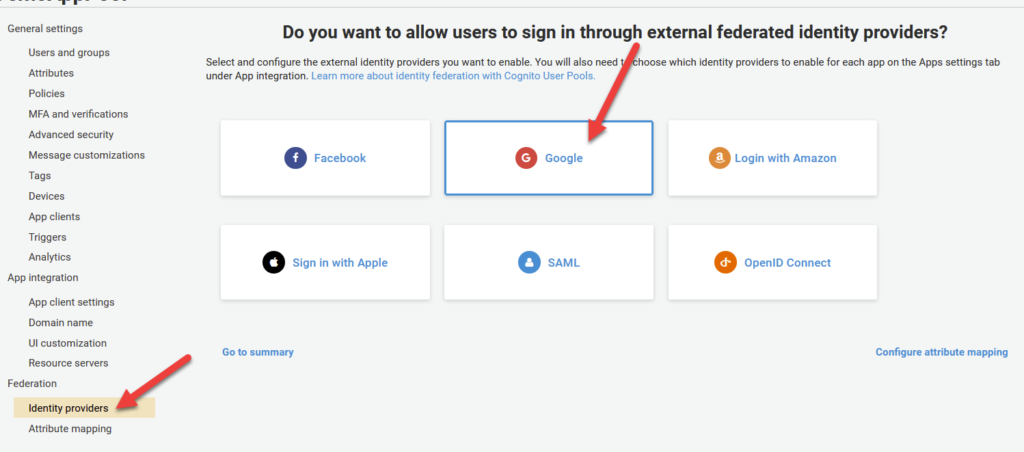
Now, we need to head back over to cognito to integrate our newly created Google Application with our Cognito User Pool. To do this, click on Identity Providers under the Federation section of the Cognito User Pool home page. From there, click on Google as the Identity Provider.
Note: You can also repeat this process (although it is slightly different from provider to provider) to enable SSO for other IDPs including Facebook, Amazon, or Apple.
After clicking google, fill in your Client ID and Secret Key that you got in Step 4. Before clicking Enable Google, be sure to add profile email openid as seen in the image above to the Authorize Scope text box. These are the resources we would like access to from Google via Cognito.
Attribute Mapping
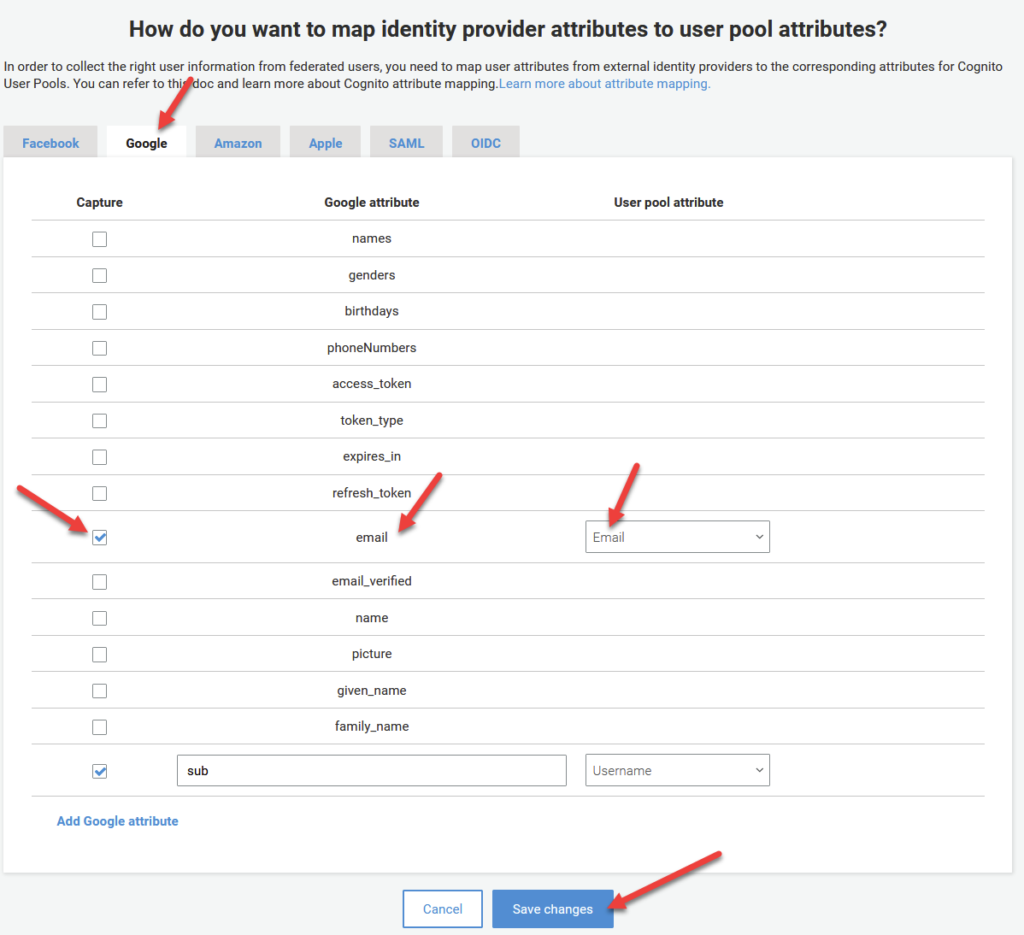
One quick fix we need to make for this integration is to re-map some values that are provided by the google response into our Cognito specific counterpart. More specifically, google provides an attribute called email that must be converted to Cognito’s counterpart which is a case-specific version called Email . Doesn’t seem like a big deal, I know, but skipping this step will cause this whole thing to fail, so DONT SKIP THIS STEP PEOPLE!
To proceed, click on Attribute Mapping on the left hand pane under the Federation tab.
Firstly, make sure you have the Google tab selected at the top as per the image below. Under the row that says email, tick the lefthand checkbox under the Capture column. Under the User Pool Attribute Column, select Email from the dropdown list.
As a quick side note, this attribute mapping pattern can be used to re-map any claims present in our response token from any IDP provider into a specific field within Cognito. Pretty powerful stuff!
Anyways, I digress. Make sure your settings match the image from above and click Save Changes.
Enabling Google as Our Identity Provider
Remember in Step 3 when we enabled our Cognito User Pool as our Identity Provider and I said we’d have to come back here after to enable Google? Well Suprise! Its that time.
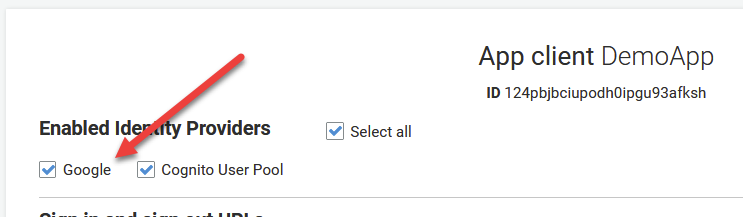
Under App Integration, click App Client Settings. On the next page, you should now see Google listed as a clickable option under Enabled Identity Providers. Go ahead and select it and click on Save Changes.
Step 6 – Verify It all Works
Go ahead and revisit your domain UI. You can access it by either clicking on Launch Hosted UI at the bottom of the page from the prior step, or by clicking on App Integration from the left hand menu.
You should see a login page similar to below. And whadda ya know, now we can use GOOGLE to sign in!
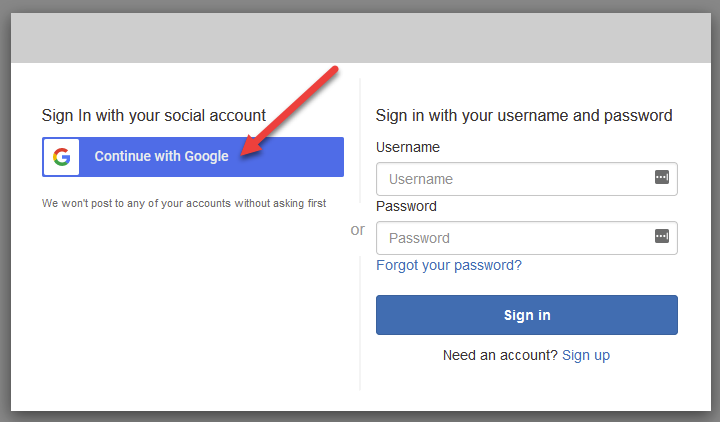
Clicking on Continue with Google shows us our customized Consent page that we configured earlier:
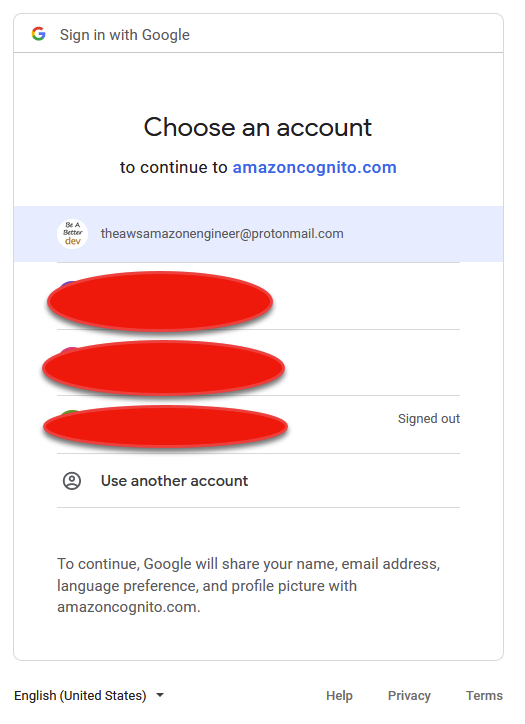
Clicking on your email will prompt you to login (unless already logged in). Upon success, you should notice you’re forwarded to your Callback URL that we configured in Step 3. Inside of it is our access_token that contains our profile information, provided from google! Lets inspect it!
Here’s the URL I received back from google:
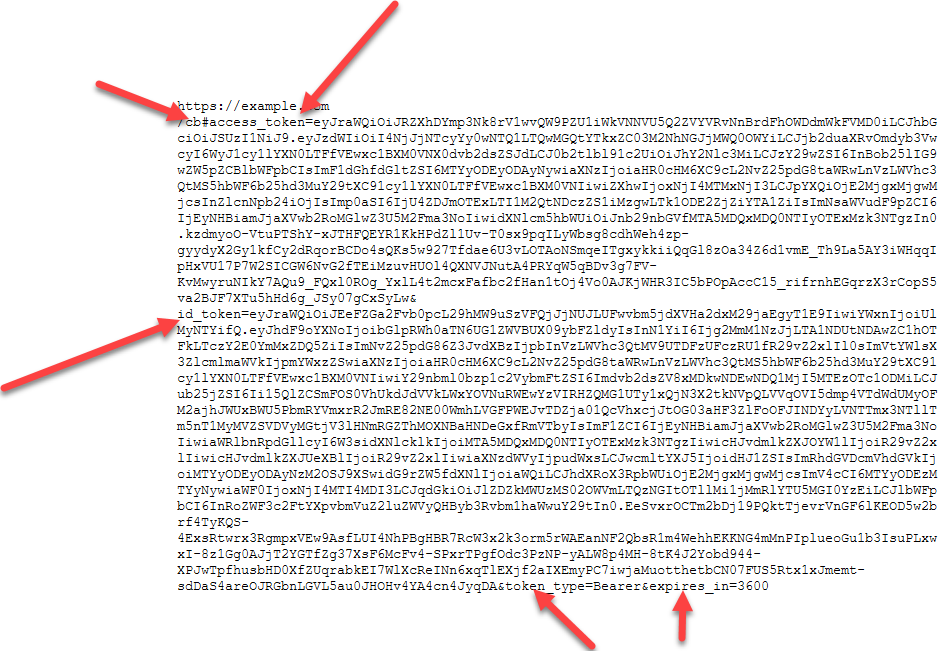
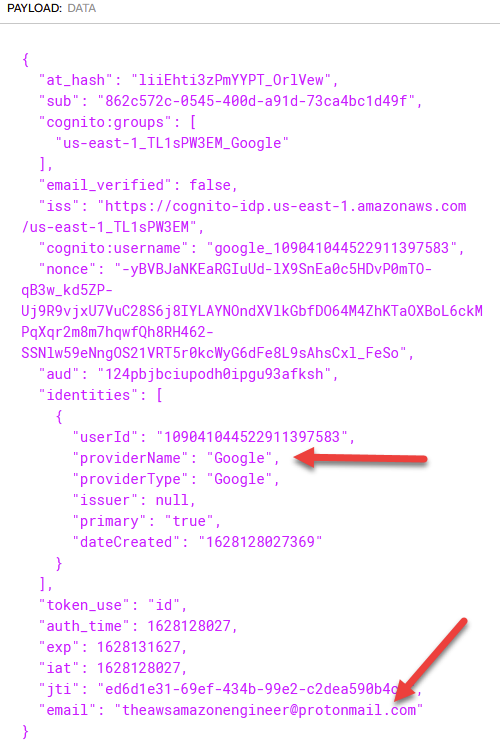
If we take these tokens over to www.jwt.io , we can decode them to check out the contents!

To top it off, if we go to the Users and Groups section of Cognito, we can see a new entry corresponding to the email I just signed in with! Mission Accomplished! Note: You may need to refresh the page for it to show up.
Summary
In this article, we’ve explored how to intergrate Amazon Cognito with Google to enable Social Sign On to your User Pool. If you want to take this a step further and learn how to secure your APIs built with API Gateway and in conjunction with your user pool, check out this handy tutorial video I created on Youtube!


very handy and simple !! Thanks !
Thanks issam! Glad you enjoyed 🙂
Awesome as always!
I found the article really handy, thank you. But I do have a HUGE issue, and you might have it too. First signup with google, creates the user in the pool. But if, on a different browser you try with the same google user to login, you get an ERROR: [redirect-url]?error_description=Invalid+user+attributes%3A+email%3A+Attribute+cannot+be+updated.%0A+&error=invalid_request
It seems to be caused by the fact that email is required.
This is really informative, although I came across one issue, which is that even though I have mapped the Google “birthdays” attribute to the Cognito “Birthdate” attribute, I still get back this error:
“attributes required: [birthdate]”
My Google account definitely has a birthday set so for some reason that attribute isn’t being sent to Cognito. I thought I’d confirm that by mapping the google “name” field to Birthdate instead. This time I got a “too many characters” error, so that suggests to me I’ve eliminated bad formatting as a cause and it is indeed the case that the birthday isn’t being sent.
Any ideas?
Thanks
Ash
Thanks
Thank You Verrrrry much
This is a great write-up, thanks!
But what do you do when you want to submit your app for verification and Google wants you to verify that you own amazoncognito.com and the because it’s listed as an Authorized domain?
The issue is, once you login, then you can’t change the login. It will not show you the login screen.
have you any idea how to fix it.