


If you’re building a fortune 500 company’s webapp, starting a small business’ wordpress site, or just looking to quickly prototype a concept on AWS, you’ll quickly realize there are a ton of ways to host your website or webapp on AWS.
This is part of the problem with AWS and that beginners struggle with – despite having all the options at your fingertips, its difficult to understand what your options are and when each one is appropriate.
Even further, another crux of AWS is that often there are multiple ways of doing the same thing, and some services even overlap with one another in terms of functionality. From a new user perspective (and even myself, an advanced user), it can often be daunting to figure out which AWS hosting option is right for you.
If any of this sounds familiar, you’ve found the right article. In this post I’m going to tell you about some of the most popular options for hosting your website, which option is appropriate for your use case, and a quick summary on how they work. So lets get started.
Prefer a video format? Check out this video.
Option 1 – S3 Static Website Hosting
Amazon S3 stands for Simple Storage Service and is an all purpose solution to store raw data objects on the cloud. It is cheap, reliable, and easy to use.
Lucky for us, it can also be configured in such a way to host your static website assets. This includes things like your HTML, CSS and Javascript files as well as any media content including fonts, images, svgs, and more. Further, you can use it to host video files to render on your website.
The folks over at Amazon has made it easier than ever to set up website hosting with S3. With a couple button clicks, you can turn your index.html file into a website (with an external link!). A great tutorial is available from the AWS website here.
After uploading your index.html file and configuring S3 to serve your content via a URL, a couple other steps are involved.
Domain Mapping with Route 53
You’ll want to set up a custom domain name using Amazon Route 53 in order to get a custom URL such as “mywebsite.com”. This is because by default, the provided URL is a nasty looking one that looks a little something like this: http:// – Yuck!bucket-name.s3-website-Region.amazonaws.com
Setting up a custom domain name isn’t all that hard of a process. It involves going to the Route53 console and changing your DNS settings including NS and A records to point to your hosted S3 file. There are a ton of great tutorials on this topic such as this one that you can follow such as this one offered by AWS.
In fact, DNS mapping is something you’re going to have to deal with regardless of which option you use, so I would suggest you get familiar with it.
You may enjoy this article on
Alternatively, I posted a YouTube video on how to register a domain name on AWS using Route53. Although the video’s tutorial isn’t directly aimed at linking your S3 file with Route53, it serves as a great introduction to the topic area. Check it out here.
Performance Boost (aka Caching) with CloudFront
Additionally, in order to increase your website’s performance for customers all over the globe, you’ll want to set up a Amazon Cloudfront distribution to serve your content faster. Cloudfront is a CDN (content delivery network) offered by AWS that provides caching services. It replicates your S3 content to nodes all across the world to better serve your customers with low latency regardless of where they live.
Keep in mind that Cloudfront setup is an optional step that will increase your hosting costs (although by a very small amount, depending on traffic), but it definitely increases the experience for your website visitors and also makes it more likely for google to rank your website higher (faster website loading = higher ranking!).
On top of that, using CloudFront will reduce your S3 costs since traffic since incoming requests your website will automatically retrieve source files from CloudFront instead of S3 itself – neat!
In summary, Static Hosting with S3 is Great For:
- Folks that are familiar with programming concepts (such as HTML, CSS, and Javascript).
- Folks that want to use front-end libraries such as React, Vue, Angular, and others.
- Folks that don’t want to worry about servers or infrastructure to build their website.
- Websites that won’t change very often, such as a business website.
- Websites that need to support for many concurrent users
Option 2 – WordPress Hosting with Amazon Lightsail

WordPress is the most popular way folks build websites these days. It helps creators or blog writers quickly assemble their website using a management dashboard, easy to configure themes, and a whole truck load of other options.
The easiest way to set up a WordPress based website on AWS is by using Amazon Lightsail – a managed service that includes a virtual machine, SSD based storage, DNS management, and ip management – all at a low cost (I pay $3.50 USD a month).
In fact, this very website is built using Amazon Lightsail and WordPress!
The great part about using Lightsail is that its super simple to setup and get started creating content for your website. Lightsail offers easy to use wizard that walks you through the setup phase. It involves selecting an instance location, instance image type, blueprint, and instance size.
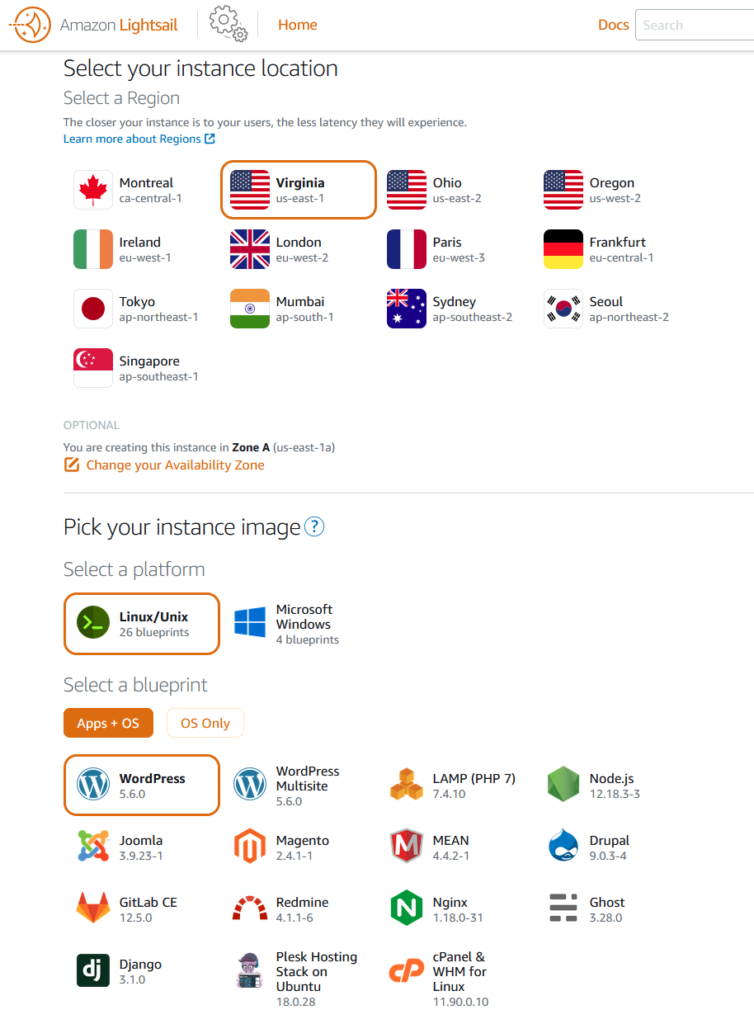
My favourite part about Lightsail is by far the guided experience. Often when working with AWS its easy to get distracted with all the details the AWS console throws at you – not knowing what you need to worry about and what you can safely ignore.
The nice thing about Lightsail is that it makes it easier than ever to get started. It even offers scaling such that you can add more than 1 instance in case your website starts to get really popular.
Alternatively, you can choose to beef up your instance by selecting a different hardware type. Both options are viable and dependent on how your using Lightsail.
So how can you get started with Lightsail? Well lucky for you I’ve created an entire step by step tutorial video on how to set up your website. It includes creating your instance, changing your DNS settings to point to it, and logging in to your wordpress administrator console. Check it out here.
Alternatively, you could certainly use Lightsail to host other backend configurations such as a NodeJS server, a LAMP stack (Linux, Apache, MySQL, PHP), MEAN (MongoDB, Express, Angular, NodeJS) and many more.
If the preset options don’t suit your use case, you can use the OS only mode and install any packages/dependencies you need manually.
In summary, Amazon Lightsail is Great For:
- Folks looking for a largely guided experience involving Wizards and easy to understand configuration options.
- Folks looking to quickly get started on AWS using WordPress.
- Folks looking to create dynamic, regularly changing content.
- Folks looking to pay a predictable monthly price without getting any surprise bills.
All in all, I highly suggest Lightsail for folks looking to start a WordPress based blog. It was mostly painless to set up and offers everything I need to create a blog that can scale to thousands of users.
Option 3 – Single Page Apps with AWS Amplify

AWS Amplify is a relatively newer offering from Amazon. Amplify is aimed at developers that are familiar with coding and looking to quickly develop modern single page applications.
I’ve tinkered with Amplfiy and used it to quickly set up both a React Native based mobile application, and an Angular based single page web app.
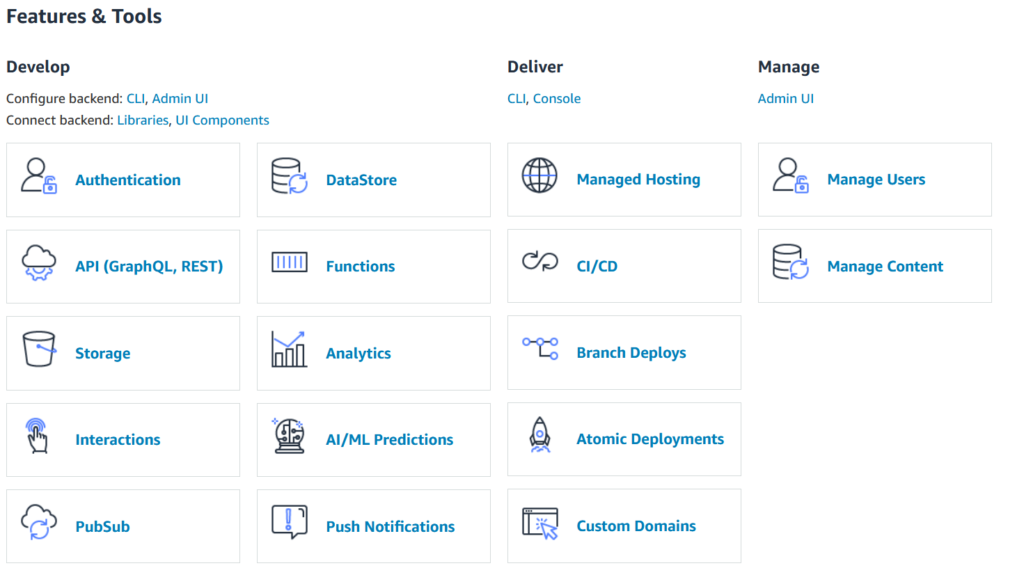
Amplify is a command line based tool – essentially it involves you downloading a program that allows you to create, develop, and deploy your app almost exclusively through the command line. Optionally, you can poke around the Amplify console page on AWS to get more familiar with what Amplify is actually doing.
Many Features, but Hidden Complexity
Amplify offers a laundry list of features that make your development experience easier. This includes things like:
- Continuous deployment after code commits
- Authentication / Authorization (login) using Amazon Cognito
- Database options (Relational and NoSQL)
- Raw data storage (S3)
- Pubsub/Push Notifcations (SNS + SQS)
- Serverless functions (Lambda)
This isn’t an exhaustive list, but helps you get the main idea of what Amplify has to offer.
Part of the problem though with Amplify is the fact that it sets up these resources behind the scenes. You as a developer just specify your requirements through the CLI and using config files.
This all sounds great – fast development right? But the issue is that it can lead to unexpected costs unless you are really familiar with the side affects of creating these resources. It can sometimes lead to unexpected bills as a result of folks spinning up resources they don’t fully understand.
This isn’t a terrible thing – Amplify’s attractiveness is based on the fact that it makes it easy as heck to set up all these resources for your application.
In summary, Amazon Amplify is Great For:
- Folks looking to build Web Apps or Mobile Applications quickly.
- Folks looking to have quick access to the laundry list of other AWS services.
- Folks that prioritize seamless developer workflows instead of infrastructure transparency.
I had a pretty positive experience using Amplify to build a quick prototype project. It was easy to setup, straightforward to use, and there were many tutorials available out there to get you familiar with some of the more advanced features. I highly suggest it for folks looking to quickly get started building their app, while still having access to other powerful AWS services.
Option 4 – Elastic Beanstalk
Elastic Beanstalk is an older service that simplifies the process of creating web sites or applications. You as developer simply worry about deploying your code, and beanstalk will take care of deploying, capacity provisioning, load balancing, and autoscaling. It enables many of the features that one would expect in an enterprise level application without a lot of the fuss of management.
I like to this of Elastic Beanstalk as a cross between Lightsail and Amplify. It provides a manged experience that is largely hands off and lets you take advantage of the plethora of AWS services. However, like Amplify, it tends to hide some of the details and makes it more challenging to understand what’s going on under the hood.
For this reason, I would caution developers looking for extensive control over their infrastructure when considering Elastic Beanstalk. Although it may look appealing in terms of its ease of use, you sacrifice control which can sometimes be a deal-breaker.
In summary, Elastic Beanstalk is Great For:
- Folks that are experienced developers looking to build apps, but don’t want to worry about the details of deploying, scaling, and monitoring of their application.
- Folks that are fine with using EC2 to host their applications.
- Folks that are fine with giving up a level of control and visibility in favour of ease of use.
Personally, I’ve only used the basic wizard to create a Beanstalk app to tinker with it. It was a positive experience that was easy to setup, deploy updates to, and monitor. I can definitely see myself using Beanstalk as a middleground between amplify and Enterprise hosting options (discussed more below).
Option 5 – Enterprise Hosting with EC2 or ECS

If you’re a developer looking to build production ready applications focused on enterprise level scale-ability, look no further.
Unlike wordpress sites, or apps built using amplify, enterprise level websites or applications often have a very different set of requirements. They require vast scaleability, extensive configuration, and logging/monitoring.
For this use case, there are a handful of options, but the ones I suggest are using either EC2 (Elastic Compute Cloud) or ECS (Elastic Container Store) to run docker containers. Lets take a look at both of these below.
EC2
EC2 is one of the first services offered by AWS. It basically involves renting AWS virtual machines. You can select what type of host you want (compute optimized, storage optimized, network optimized, etc) and pay by the hour. Costs are slightly different across AWS regions.
EC2 is the bread and butter of many high scale web applications. It provides developers with fine grain control of the entire web application including networking, storage, load balancing, and security. The tough part though is that you need to get familiar with all of these concepts and how they work on AWS – buyer beware!
I consider EC2 to be one of the lowest level building blocks on AWS. It is literally the foundation of AWS and upon it, many other services are built. After all, the cloud is just somebody else’s computer!
With great power, comes great work and responsibility. Developers using this option will be exposed to the endless number of options at your fingertips.
If you’re experienced with using AWS and need access to virtual machines to configure in a very specific way, EC2 is probably the right solution for you.
ECS
ECS is Amazon’s Docker image hosting service. It allows developers to upload configuration files using Docker and run their containers on the cloud.
Developers have two options in terms of hosting: run your infrastructure using EC2 instances, or run in a serverless mode called Fargate. Both have their pros and cons in terms of reliability, monitoring, and ease of use, so I suggest you do your research before using one.
If you’re interested in seeing how to create and deploy a simple NodeJS app using ECS, you can check out my Youtube video here.
Both options (EC2 and ECS) based are certainly viable when configuring your website or web app. Using both, you have access to the rich set of tools to scale including load balancers, and also the tools you need to adequately monitor your applications health (health checking, logging, monitoring, etc).
You really can’t go wrong with either of these options. Just be aware though, if you’re venturing into this domain, there’s a lot of custom configuration you’ll need to do and learning about other low level aws features. I would only encourage these options to folks that are well experienced with AWS and understand the intricate details of building applications.
In summary, EC2 or ECS are Great For:
- Folks looking for enterprise level scale-abiltiy (millions of users)
- Folks looking to have complete control over their website and system environment.
- Folks that require comprehensive monitoring and logging solutions to assess the health of their applications.
- Folks that have a deep understanding of AWS fundamentals including but not limited to: Networking, Security and Storage.
I have personally built many enterprise level applications using dozens of EC2 instances in a single application’s cluster. If you have fine grain requirements that require complete control over the execution environment, EC2 or ECS are probably the right solutions for you.
Summary
In this article, we’ve talked about 5 of the options available to you to host your website or web app on AWS. As you can probably tell, there are many different paths you can take depending on what your building and why you are building it.
I hope you have found this article useful in clearing up any confusion. Let me know what you think of this article in the comments section!
Like this content? Check out my YouTube channel where I talk about many more AWS topics!


Advantage of CloudFront Vs plain S3: ACM. Running any website without SSL is pointless today.
Thanks for pointing this out Markus! I’ll update the article to reflect this. Cheers.
Nice summary of the various options on AWS. It can be bewildering for sure!
Any thoughts on AWS Amplify Studio. One apparent advantage (I’m just kicking the tires now) is that it can group the various services used under one project, with config-as-code, and with a UI builder / “service configurator”.
The ability to manage access to the project with simplified permissions is nice too: just an email, no IAM account needed.
Kindly elaborate on Managed Hosting provided under Amplify. For a beginner having a static website built on wordpress, with no videos, will Amplify be the right choice? Your valuable views.
Thanks for this clear presentation.
Starting with AWS is very confusing given the number of different yet somewhat similar options.
You helped me see a bit clearer, even though this article is nearly 2 years old.
Thank you for that 🙂